RackForms
v7.8.9
confirmation

Latest Release: Build 959 - November 6th, 2025

Home > Page Elements > Confirmation

In Brief: RackForms jobs must contain at least two pages, form pages and confirmation. Form pages contain the fields that collect information from your users, confirmation pages tell RackForms what to do with that collected data.
Dependencies: At least one 'Form' page.
Hints & Tricks: Confirmation pages default to Free Form layout, but you can also use Sortable.
Options/Properties
Form Pages have three main property types:
Hints and Tricks
Global Timestamps And Visitor IP Address Variables
It's a common need to acquire a timestamp or visitor ip address for a form submission or other logicical operation. In SQL+ items we can use the built-in tokens $timestamp and $datetime. However, prior to Build 692 items like Simple Email and Email+ did not have access to these values.
This has been addressed, as we now have this pseudo-global declaration on all pages (form, builder and confirmation) :
// Global Timestamps
$timestamp = time();
$datetime = date('Y-m-d H:i:s', time());
$remote_ip = $_SERVER['REMOTE_ADDR'];
This means we can use these PHP values in any place that support the PHP token.
This means we can create an Email+ item with the following Email Message:
This is the raw timestamp: ${timestamp}
This is the datetime: ${datetime}
This is the visitors ip address: ${remote_ip}
And in the received email, we will get:
This is the raw timestamp: 1283616488
This is the datetime: 2010-09-04 11:08:08
This is the ip address: 127.0.0.1
Of course we can always create own own timestamps or ip blocks in the PHP Top Code block as needed.
Form Properties
Encode Type
Here we set Method, ID Name, and Encode Type. ID and Name are html properties, and should not be changed in most circumstances. Encode Type allows you set set a form up for file uploads, however, RackForms will automatically set this property for you when you add a file upload field element, so you typically do not need to change it.
One thing to watch out for: DO NOT use form for the ID or Name property of your form as this will break Internet Explorer 8 and possibly newer versions.
In general these items will never need to be changed.
Collect Geo Data
This option, when enabled, will prompt the browser to collect Geo data information from the user via a call to: navigator.geolocation.getCurrentPosition. The data type returned is defined in the W3 specification, and in general, is Geo-location data based on a series of queries to the device. Thus, if the device supports native GPS location services and such a signal is available and current, we can generally assume this is what the device will return. However, the data may also come from queries to IP address location, WFID, and so on. Broadly speaking, although the spec guarantees geo location data, how this data is gathered depends heavily on device, browser, and single. Read more about the types of data returned in Firefox browsers here, and Google Browsers here.
We can call this function manually with: geo_locate(), a common use case then would be to create a simple Button element and add this code to its Basic Attributes > Extra Attribute(s), JS, Event Code, etc block:
onlick="geo_locate();"
We can use the following tokens when using the Geo-location feature:
F{geo_lat}
F{geo_long}
F{geo_accuracy}
F{geo_altitude}
F{geo_heading}
F{geo_speed}
F{geo_timestamp}
Collect Analytics Data
Enabling this feature tells RackForms to write every page access call to your local RackForms database for analytics purposes. We can access this data at any time in the Editor or Entry Viewer.
Please note this feature is disabled by default, as not all jobs will require such data collection, and any job that uses this feature will require direct access to your RackForms database. Thus, if we enable this and place the job on a third party server, the form will fail as it has no connection to your database.
To remove analytics data from your database, either delete job entires from the entry viewer, or delete the job.
Please also note that setting to this to Yes on one page activiates data collection for the entire job.
Offline Submission
Note: This feature is not yet available. This option, when enabled, allows users to save a form without being connected to the internet. They're then promoted to return to a submission point when do do have access to submit any cached entries.
Page Not Required / Allow Direct Access?
*if you clicked the notification link in the editor or the help link on a form page to get to this page, this section describes this very important item as shown in the screen-shot below:
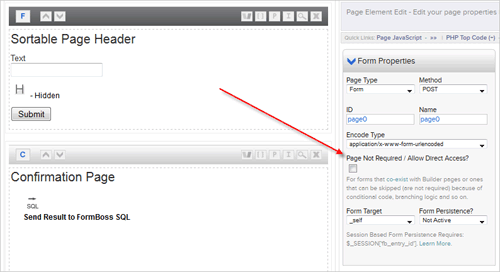
So what is this checkbox and what function does it serve? In short, the setting allows us to bypass a RackForms continuity check that:
- Blocks us from viewing the page if we haven't visited the jobs 'prior' form pages first
- Prevents us from submitting a form through to the confirmation page if we 'skip' a required page.
The chief use of this feature and why we'd want to activate (check it), is for jobs where:
- We have multiple page jobs where Builder pages intermingle with standard form pages.
- For pages that can be skipped because of conditional logic.
- For PDF Output Pages.
- For jobs that contain several smaller pieces that can be accessed independently of each other (like a job with a login page and regular form pages).
RackForms 2 users please note this is brand new behavior. In version 2 (prior to Build 706 SP6) we could have 'dummy' or test pages in a form and they would not affect the final form. This is no longer the case. If a page exists in a RackForms job it's potentially 'live' and if it can be skipped or would otherwise never be hit, we must check this box for that page.
For example, imagine a job where you have a Builder page as the first page of a job and the second page is a standard form page. A user who tries to visit the form page will be bounced back to the first page of the form (the Builder page), as RackForms assumes the user is trying to "skip" ahead in a normal multi-page form. Of course this is exactly what we would want in a "all forms" job, but not want we need in an application job with mixed page types.
The other common example is a job where we have three pages -- two form pages and a confirmation page. The first page is required but the second page is not. If we filled in the first page and skipped directly to the last page we will receive an error saying the form has not been filled out properly. This is because RackForms expects the second page to be filled out for the submission to be considered valid. To fix this we would check the box on the second page to tell RackForms that the page can in fact be skipped by the user.
Thus, this checkbox lets you bypass the security check which means a user can access any form page at any time, regardless of the pages they have "skipped" in the normal form flow.
What's most important for users is jobs that have 'dummy' pages that are not part of the forms main flow, or pages that can be skipped because of conditional logic must have this box checked for the form to submit. If we do not do this we'll receive an error message on a blank white screen instead of the confirmation page that shows something similar to:
All required pages must be filled out before we can submit this form.
Form creators: Please be sure to check the: "Page Not Required / Allow Direct Access?" box under: "Form Properties" for each page that can be skipped.
Should this happen, as the message says we'll need to check the box to enable that page to 'skip' the validation process for EVERY form page in the job, even non-active ones.
This means if we have:
- Page 1 - Builder page
- Page 2 - Form page
- Page 3 - Confirmation page for page 2
- Page 4 - Work in progress test form page
Page 2 and 4 must have the box checked. If we only check the box for page 2 the form will not submit through and we'll get the same error message.
Form Target
This option lets you set the form target, though please note this is only meaningful for Form Pages. This is useful for times when you want the form submission to open in a new window, or some other special circumstance. For reference, the default value is _self, which opens forms in the same window. _blank would open in a new window.
Form Persistence (Save and Resume Later)?
This feature allows us to persist our from responses across multiple-browser sessions. In other words, we save and reload our form fields responses even if the user shuts down the browser.
>> To learn more about Save and Resume Later please see this RackForms Explainer Video.This feature is set on a per-page basis, which means we can choose to not save specific pages form fields, such as a sensitive payment info page, for example. That said, while this is a powerful feature you need to be certain to activate the feature for new pages, as it is deactivated by default. The key then is that RackForms doesn't enable this mode by default, you do. Take care when doing so however, as saving user data is a very sensitive area!
One final note: in order for form persistence to work, we must activate it for each page in the job we want users to be able to return later to. This is of particular importance when using the Fully Automated Resume mode is set to Next Form Page In Sequence.
Currently we support three modes of persistence:
IP Based: In this mode we use the users remote IP address as a key. This is the simplest method to use, as it requires no further action from you--simply enable this mode and your users responses are saved. However, while simple it could be considered the least secure, as we can never guarantee the authenticity of the IP address, and also any user data could be later picked up by a third party if the form is not fully submitted. For example, a user fills out the form on a public computer but doesn't submit the form, the users form values will be reloaded for the next user even if the browser has been shut down.
Session Based: In this mode we rely on a SESSION value called fb_entry_id for loading form fields. This method takes a bit more setup compared to IP Based because we do not create this SESSION variable and value for you. You must create it, and in general this is the result of a login page. The database field for this value is a VARCHAR(255), which means while numeric values will work, you can and should use more distinct(difficult) keys when possible.
Even without a full database login process you can easily test this mode by adding this code to your PHP Top Code Section on the first page of a form:
<?php
session_start();
$_SESSION['fb_entry_id'] = 10;
?>
This code starts a PHP session, then creates our SESSION element: fb_entry_id with a value of 10. This value will now be used for all communication throughout this form session.
Again though, in a real environment this value must come from a logic script of some sort, which can of course build right in RackForms using the Query Module.
In short then, to use SESSION Based persistence all we need to do is supply a PHP session element called: fb_entry_id. That's it. No other setup is needed. So long as this session element exists and contains a unique(!) value, RackForms will automatically use this value to populate existing form entry values.
The key to implementation then is not so much providing this value, but rather how the value is created in the first place.
A good place to do so is in your login script, specifically, grab the unique ID field of the user table and set:
$_SESSION['fb_entry_id'] = $login[0]['id'];
Doing so essentially says "when this user logs in they have a unique ID created by my database. As no other user has this ID in the system, I can use this value to set the fb_entry_id session element. Then, when a user hits a page that uses SESSION Based form persistence, RackForms will automatically take this value and, for every page the user completes, add a list of values to the fb_job_entries_tmp table. When the user hits the same page again, be it 5 seconds later or 5 days later, so long as the user has the same fb_entry_id SESSION value set we'll grab any values from the fb_job_entries_tmp table and pre-populate the form.
This cannot be stated strongly enough: This method is by far much safer than IP Based because it assumes the user had to authenticate to reach the form in the first place. A good analogy of the proper use of form persistence would be online tax software. I trust such systems, but only because I need to login before any forms with saved values are shown.
Important Notes
- In both modes the persistent values are only cleared when the user submits the form. This means we need to always pay close attention to what data we save, especially when using IP based persistence.
- It's important to note we do not need to set a persistence value on our confirmation pages, only for form pages.
- As of Build 694 this feature has been expanded to include saving all elements of a form field, including such data to properly populate the Simple SQL module such as the fields label property.
- Another major enhancement in Build 694 is the ability to allow our forms users to return to any previously completed page in the form. This allows for much more advanced form persistence, in that we now effectively allow our users to return to the last page they were on, as opposed to the old way of saving form field responses but forcing users to start at the first page of a form.
Important Limitations
- This feature requires RackForms and the full RackForms database. This means you cannot use this feature for client forms that use the stand-alone entry viewer.
- Form persistence (Save and Resume Later) canot be used in conjunction with Bucket Repeaters.
- Email sending is handled via PHP's Mail() command. This means you're web server must be configured to send email using this command, which for windows users means a properly configured PHP.ini file. Read more.
Fully Automated - In this mode RackForms creates a button next to the standard submit button of the page that when clicked, generates a unique URL and presents it to the user. The user simply needs to save this URL and paste it into a new browser at any time to resume the form session. This is by far the most simple and secure method to allow form persistence.
Fully Automated Resume Mode
This option defines how the user returns to the form via the resume link: at the last page they visited, or the next page in the form page sequence. In most cases it's safest to use the default, Last Page Visited, as this way the user will have a chance to recognize where they are in the form sequence.
In both cases we provide a query string variable: ResumeMode.
This item will be populated with LastVisited when using Last Visited, and NextInSequence when using Next Form Page In Sequence. We can use this variable to show the user specific instructions and information to help ease them back into the form.
For example, we could add this code to a Code Block Item, just after the page header:
if(isset($_GET['ResumeMode']) && $_GET['ResumeMode'] == 'NextInSequence'){
  echo 'Welcome Back!';
}
This will help users know they've performed the correct action, and ease the transition back into the form process.
Finally, as noted in the introduction above, when using the Next Form Page In Sequence option, we must be sure that the next page in the form sequence has Save & Resume Later set to Fully Automated. If unsure, it's usually safest to simply set this option for all pages in the job.
Making Udates To Existing Forms
The save and resume logic uses a key based save syste, meaning we store values for fields based on the field name. Thus, with some exceptions, so long as the Field Name property remains the same, we can change most other properties about a form and any "in-flight" forms will be unaffected.
We can delete fields no problem, though of course those fields would no longer be populated, though any logic a form submission may have used in the previous iteration of the form would still work so long as the fields being written aren't something that breaks in their absence. For example, we have a field which is a required (not null) field in a database, and we no longer submit that field so the database INSERT would fail.
Form Style Properties
Full Page Template (Formerly Responsive Style)
This important setting applies a global, responsive style to all elements on a page. Depending on the selected option it may also (temporarily) convert your page into a full page form, where the entire form sits in the middle of the page and resizes properly as users adjust device layout, screen size, and orientations.
Broadly speaking we have two modes of operation. The first is using RackForms provided styles, the second is defining your own styles using the Template Manager.
RackForms Provided Styles
RackForms Provide Styles are broken into two categories — responsive fields only, and full page with a masthead. The responsive fields only mode means we'll apply a custom style template to all fields on the form, as well as make all of those fields responsive (meaning they resize appropriately when users resize the browser window or device). The full page versions use the same field styling, but then also make the content "full page" by centering your form and adding a masthead. The goal here of course is to make forms that stand on thier own with zero effort.
Each of the RackForms styles has a distinctive style and feel, so we encourage you to try them all and see what works best!
Custom Template Manager Styles
These styles are ones you define, and are managed in the Template Manager. The Template Manager is available to Admin users as a link at the top of the screen.
The power in Custom styles is they allow you to create full page responsive forms that have your organizations exact branding. The main benefit of course is this allows us to direct users to a RackForms form elsewhere on your domain without it looking like they've left your site.
The first step to working with Templates is to visit the Template Manager page and either modify the example template RackForms ships with, or to create a new Template and add code for each section. Any templates you create will be added to the Responsive Style menu.
Important: Custom Template Manager Styles override any values used in the RackForms API Global Header Code and Global Footer Code. Thus, if you need any functionality from the API version please be sure to include that code in your branded version. For example, Google Analytics tracking code, font definitions, and so on.
Please be aware of the following limitations and concepts when using any of the Responsive Styles:
• It's generally best to avoid adding additional styles that may override the responsive style's set values in blocks like the Page JavaScript / CSS Code area. If absolutely necessary, be sure to check the added styles for any unintended side-effects.
• Responsive styles only work when Page Layout is set to Sortable List.
• Responsive styles are not meant to be used in conjunction with Form Style Properties > Center Form and Form Style Properties > Apply Box Shadow.
• Responsive styles and Builder pages work, but generally only visible affect the page when a full page style variant is used.
• The Material UI Style may need to have small z-index changes made to select elements placed within buckets. If you find that when activated a select menu's items are being covered up by other elements, click the select item in question and increment its Field Style Properties > Element z-index property by one. If this doesn't fix the issue, repeat until the select item's content are no longer obscured.
Global Text Color Override
This feature allows us to set the global text color property for all label elements on that page. This is very handy if we have to change the text color and our form contains many items--changing each item would be tedious. Please note however, that this operation effects all label fields on that page.
Global Font Weight Override
This field lets us set the font weight of all page elements.
Font Family
Select the Font Family to be used in the confirmation page. All field elements will use this font as default, however, you can always set individual item styles using the Extra Attribute(s) JS Style Etc text area available for each field item.
Custom Font
Input your own font name in this text box to create unique designs and form looks. Also useful when a client requests a font that is not available in the default set.
Google Web Font
The newest generation of Web Browsers bring with them an exceptional number of features and enhancements, one of the coolest is the ability to load custom web fonts. Their are several ways to deliver these fonts, the method RackForms implements is to use the Google Web Fonts service.Using these custom fonts couldn't be easier: simply select a font from the list and it will be used when you run the form. To revert back to standard web fonts just select 'Do not Use Google Web Fonts API' from the list.
Please note that their is a size penalty for using custom fonts of around 15kb. All told this is a very small number consider the larger web page they're used on, and the results are simply spectacular and well supported among the most popular browsers, from IE 9 to Firefox, Safari, and Chrome.
Please also note that RackForms automatically provides the proper fall back code if a browser doesn't support custom web fonts. In such cases the fonts used are simply the ones set in the standard Font Family option box.
Finally, please note that at this time we cannot preview fonts directly in the editor.
All Content Uses 100% Of Available Page Width
This option allows us to create forms that span the entire width of our page. Critically, this also means the elements within the form layout, including all form field containers.
This is handy when we have a template driven, data heavy form. The content with the form will be set to 100% wide, along with the container, meaning all elements take up the maximum amount of space.
It's key to note this mode is not reflected in the editor. That is, the editor will still show the page as using the width value set in the Page Size Values box.
Make This Page Responsive
This option acts as a shortcut for the All Content Uses 100% Page Width setting, as well as setting all form field items on this page to 98% of the page width. This is a very fast way then, to make the page fully responsive.
Please note we'll also want to make sure our iFrame embed code uses
width='100%'.
Center Form
Check this box to have RackForms center your output form. This is most useful when you have a RackForms form as the only element on the page, as in a standalone form.It is important to note that the style of the center will differ slightly depending on whether you have a Free Form or Sortable Page:
Sortable Page - RackForms will add a small 15px pad to the <rackforms-output-div> to push form elements out from the containing DIV's edges. This is done because if you have a background color applied to your form via Form Bg Color, your form items will touch the edges of this div which can look unprofessional.
Also, while the default width of your form will be set via style sheet to 500px, this can be changed by setting the appropriate value in the Width Property of the POSITION AND SIZE editor, located below the Form Preview box.
Free Form Page - RackForms will create the centering div style only, no padding is added.
Apply Box Shadow
When checked this will apply a CS 3 boxed shadow to the main rackforms-output-div element. This is most useful for centered, full-page forms. The effect is based in CSS, and is fully supported in Firefox, Chrome, Safari, and IE 9+.
Apply Border Radius
Along with Apply Box Shadow, another great CSS 3 property we can apply is rounded corners. The technical name for this attribute is called border-radius, hence this options name. When enabled, the rackforms-output-div will have rounded corners, creating a professional look for the form.When used with Apply Box Shadow and Center Form we can create beautiful full page forms with ease.
Border Radius Size
This is the radius in pixels the rounded corners will take on. The default value of 5 is a good start.Please note we do not need to specify px, just the numeric number which is in px.
Page Margin
Set the desired page margin in pixels. The default value is 5, though you may find some iFrame include scenarios with IE will display a white border around the edge of the form. Setting this value to 0 will eliminate this white border.This setting effects how far the full page contents sit from the edge of the browser window.
Page Padding
The amount of pad in pixels to apply to a page when Center Form is enabled. By default we apply 15px which means when in Center Form mode all page elements sit 15 pixels from all four corners.This setting affects how far elements within the form page sit from the form page border. Please note this setting does not affect forms that do not have Center Form enabled!
Sortable Item Bottom Margin
This controls the bottom margin of all sortable items. It defaults to 5px which is usually a good value for unstyled input items. However, when adding CSS properties to forms or using larger than standard form field heights, it's a good idea to let the form breath a little by increasing this value.It should also be noted that when we enable Table Layout Mode this value and Item Bottom Margin are combined in the final form output. While RackForms attempts to create a 1:1 relationship between the editor and final output, you may need to adjust these values somewhat to get the desired output.
Sortable Page Height Method
This property, only visible when using sortable pages, lets us set how the page height is determined. The default value: Dynamic - Page Contents Determines Height, means the page height is based on the contents of the page. This is usually what we want for pages that contain Conditional Processing items, as this way the page will resize itself according to how much is shown on the page. This means if we have a block of hidden elements they do not contribute to the height of the page.It's important to note this is not an issue for full-page forms with no Form BG Color set or embedded iframes on pages with the same background color. This is because on such layouts we cannot see the 'end' of the page to begin with, so page height has no meaning.
However, if we're creating full page forms with differing values for Form BG Color and Body BG Color this setting will ensure the form height is only as tall as the page contents.
Technically speaking, the default value simply does not apply a height css property to the fb-output-div element, whereas the Fixed - Value In 'Page Size Values' Used option sets the page height to the same value as defined in the Page Size Values > Height box (the box on the lowest part of the Edit Form Attributes area).
One very important point is this setting has no effect for forms that use the iFrame embed technique. That is, when we click the Embed Page button on a page header the height property set in the Page Size Values > Height box is what's used to create the iFrames height="" html property.
This means if our page has dynamically hidden elements the page height will always be large enough to show all elements in the embedded page. This is what we want of course, but the trick will be for some layouts -- again those that use different page background colors -- we will have a disparity between the height of the iframe when not showing any hidden elements vs. when it is.
The best rule of thumb then is to limit the number of dynamic elements on one page if using the iFrame embed technique, or to simply create a full page form of the job.
Form BG Color
Sets the background color of the <rackforms-output-div>, the wrapper div all forms are created with. It is important to note that as most html pages have default margin applied, setting the Form BG Color will not make the entire page background this color. To do that, you need to set the Body BG Color property as well. This setup gives you maximum control, as the page and form can have different colors.NO COLOR HINT: To make a form have
no color applied to the background
element, (the default is white), select all text in this field and hit
delete. If the delete works, the text display will show 000000, then when you
select the element again, a single # sign. This is helpful when you need to
place your form in a graphical layout where you want your form to 'float'
above an image, for example. This tip goes for the Body BG Color property as
well.
Body Bg Color
Set the <body> tag background color. This is done via style sheet selector on <body>, so it may not always be appropriate for your page. See Use body BG Color below for more information.
Form BG Opacity
Controls the opacity value of the form wrapper DIV. Defaults to 1, with acceptable values being 1 down to 0 in decimal values.
Body BG Opacity
Controls the opacity value of the page. Defaults to 1, with acceptable values being 1 down to 0 in decimal values.
Apply 'Form BG Opacity' Value
This value allows us to control how opacity is applied to the Form background DIV. The default value is To All Page Elements. This value works very well for darker layouts. For lighter layouts, To Just The Background is usually the best.
Use Form BG Color
Check this box off to prevent any color information from being applied to the form element.
Use body BG Color
Because setting a background-color style on the <body> tag is not always desirable, you have the ability to disable this feature all together with this check box. Unchecked means no style sheet is created, which means the body tag is left untouched by RackForms.
Form Link Color
This will be the color of any links you create in your form. It sets the value of the following css definition:.RackForms-output-div a:link { color:#0D00AE; text-decoration:none; }
In short, any link inside of your .RackForms-output-div will be effected, though not any any other fields in say, a page your RackForms form has been included in.
Underline Links
Choose whether to have your links underlined or not, per your forms stylistic goals.
Use CSS Styles For Links?
This option allows us to toggle the default style css styles for links for the page. This is most useful for times when we want to define our own styles for the page, which is common when using PHP includes for navigation pages that use the Page Export Mode of Form Fields Only.
Apply These Style Settings To All Pages
When clicked this button will apply the current page style values of:- Page Background Color / Use Background Color
- Body Background Color / Use Body Background Color
- Error Color / Use Error Color
- Error Style
- Link Color
- Link Underline
- Page Margin
- Page Padding
- Center Form
- Box Shadow
- Border Radius / Border Radius Value
- Page Width
- Font Color
- Font Weight
...to all other pages in that job. This can be a huge time-saver for creating and applying one pages' styles to all others.
One particular area is when we create a two page form, a form page and a confirmation page. We want to keep the same style on both pages, but we cannot copy the first page (the form page), because it's a form page and we need a confirmation page type. Thus, with a simple click this button will apply all styles to the confirmation page.
Layout Grid Overlay - Used to be known as [ Grid Overlay ]
This feature lets you display a series of grid elements underneath the contents of your form layout. You have several styles to choose from, some will be better for "dark" forms and other for "lighter" ones. The last option, Combo 50x50 is a compromise between all other styles. Please note the number after the overlay name is the spacing in pixels between each vertical and horizontal line.
These options let you set a form to display in Table Mode. Table mode is simply a way of displaying the form which is similar in appearance to a table, where each form element label is justified in opposition to the form element. More importantly, each label and form element is also aligned with all others, creating a clean and professional looking form.
Responsive Sizing: As of RackForms Build 901, this layout will always be responsive when shrunk below 520 pixels. Prior to this, we needed to set our page style to All Content Uses 100% Of Available Page Width to have this mode responsive.
Enable Table Layout?
Checking this box will enable the table layout mode. Feel free to experiment, as this mode can be toggled on and off at will.
Left Column Width[In Pixels or %]
The width of the left column of elements, which are always the form fields labels. We generally want to keep this around 120-200px.
Right Column Width[In Pixels or %]
The width of the column holding the input elements of your form. Please keep in mind this value, along with Left Column Width, must be less than the width of the form page, otherwise you could have div collapsing problems.
Left Column Align
The alignment of element in the label column.
Right Column Align
The alignment of elements in the right column.
Item Bottom Margin
This property allows us to set the space between elements. In HTML/CSS, this is simply the margin-bottom property. A default value of 15 is used, which generally provides a good balance between space economy and visual aesthetics.This value should always include a measurement unit of px or pt. If no measurement unit is provided, px is used by default.
Notes on Table Mode:
The only elements to display on the left side are form field labels, all
other elements display in the right column.
You must be mindful of the left and right column widths you set in the editor, as if they are greater the page width your div's will 'collapse' on each other, meaning the table layout will break. This is only a concern in the editor, the final forms do not display this behavior, but it is a useful guide.
You can use Table Mode in Free Form Pages, though they work best with sortable.
The Right and Left Column Width fields must have a px or % after the numeric value.
If you select Right align for the left column and left align for the left, you labels and field element will 'touch', as their is no spacer element in between the two elements. Thus, you will generally want to add html tags to your label field to create space.
It is best practice to create all forms first, then set a width and alignment.
'Hidden' elements such as SQL+ and Simple Email do not participate in the table mode layout, they always left justify in sortable pages.
Page JavaScript/CSS Code
Extra Head Code
Part of the JWiz feature set, places any content typed into the text area into the <head> portion of your page code. This means you can add <script> content, link to external css files, add meta tags, or add any other code that belongs in the head tag.
Included Javascript Library
Because coding in vanilla JavaScript can be tedious, RackForms allows you to automatically link leading JavaScript libraries into your page simply by selecting which one from this menu. Not only are the appropriate code file(s) included, but the proper <script src=""> attributes are added to your source code. The included libraries are:
Prototype 1.7 standalone or with Script.aculo.us 1.8.1
jQuery 2.1.4 Production / Development / with jQuery UI
Dojo 1.2.3 Base or Full Dojo Toolkit (Toolkit requires an unzip to work)
jQuery Mobile 1.2.0
Together with the Extra Attribute(s), JS, Event Code, etcc attribute available on most field items you can produce dynamic forms with very little effort.
You will also notice several variations of the Prototype and jQuery libraries. These are included to make sure we only include what's absolutely necessary to build the job, while at the same time providing easy access to the most powerful non-standard features of each library.
Tooltips [ Tool Tips ]
When we include one of the two Prototype JS libraries we automatically gain the ability to add tooltips to our forms. To do so, we need to add the following code to the forms elements Extra Attribute(s), JS, Event Code, etcc field as:class="fb-tooltip" title="Hi, this is a tooltip!"
In other words, we add a class attribute of fb-tooltip, then set the title attribute to be the text of the tooltip.
*update* To make tooltips even easier, this method, while still working, has been automated by form field items Tooltip Options.
Token Support
We can use RackForms 2 Tokens in this code area. The token code is wrapped in an isset() block, which means even if the token isn't set, the code will still be valid in terms of PHP syntax. That is, if the token is not set or has an empty value, the Page Code will simply be empty where this token is placed.
Insert Custom Head Code Blocks
These links allow us to quickly add custom code blocks to our form. Even better, we can add to this list with our own code blocks. To learn more, please open your RackForms directory and navigate to your RackForms install: app/helper_code/ReadMe.txt
Included Additional Javascript Library
This feature allows us to extend the core modules RackForms ships with by including the library selected into the form output. This is an incredibly powerful feature, as we literally add new functionality to RackForms!
How It Works
The key feature of the Additional Code system is we control the items shown in the menu, as any folders we place into the:
app/movefiles/additional-jslibs/ directory show up in this list.
When we build our form, the entire contents of that directory are included in the form output in the js/ directory.
Using Code Libraries
Including code into the form folder is generally not enough for this code to do anything useful. Generally speaking, our included code only supplies the source files for the library we wish to use. We'll cover how to specify this code in the next section. For now, to actually use the code we must call the code using custom JavaScript code we provide in a Code Block item, or in the PHP Head Code section.
To aid in this process some code libraries, such as tingle-modal-dialogs, will prompt us to create a Code Block item that includes
the needed code to run the functionality we want. Most others, however, will need to be invoked manually. To aid in this process,
most libraries have example code in the rackforms-include-code.txt file, which we'll find in the
app/movefiles/additional-jslibs/{LIBRARY NAME} folder.
In summary, to use a code library simply select one from the list, and then eiether have RackForms add the invokation code
itself (if provided), or check the rackforms-include-code.txt file for examples.
Adding New Code Libraries
To add a new library, we'll first take the source folder the library supplies and place it into the
app/movefiles/additional-jslibs/ directory.
Next, create a simple text file called: rackforms-include-code.txt at the root of the plugin folder.
This file must include a full set of HEAD code include directives so that the code loads at runtime. For example, the built-in library that ships with RackForms (multiselect2side) uses the following code:
<!-- the full contents of this file are included in the head block of your page -->

<!-- note to work we must start with the js/ directory, then the name of the folder -->

<link rel="stylesheet" href="js/jquery.multiselect2side/css/jquery.multiselect2side.css" type="text/css" media="screen" />

<script type="text/javascript" src="js/jquery.multiselect2side/js/jquery.js" ></script>

<script type="text/javascript" src="js/jquery.multiselect2side/js/jquery.multiselect2side.js" ></script>
Note the code path starts at the base of the RackForms job folder, goes into a folder called js/, and then goes into the plugin folder itself.
If we saved our job at this point we'd notice the code included in the rackforms-include-code.txt file has been
appended to the top of our form page. If we look at the job folder itself, we'd also notice the entire libraries source
has been moved into the js/ folder. This is the magic of this feature: The library has been totally integrated into our job
and can be called at will. Of course, as mentioned above this doesn't mean our code will actually perform any work for us. To perform
work our code usually needs to be called. This can be a cumbersom step to perform over and over again, which is why the next step comes into play.
Instead of creating the invokation code manually, we can create an optional file called raw-code.txt in the root
of the additional code library folder. That is, at the same level as the rackforms-include-code.txt file.
This file will contain the raw JavaScript code needed to actually invoke the library feature.
Back in the RackForms editor, if we accept the prompt to do so, this code will be added to a new Code Block item which is directly inserted into your form.
For example, tingle-modal-dialogs creates modal dialogs, so our optional code creates a new instance of tingle.modal,
populates the modal with content, creates buttons, and finally shows the modal.
Please note in most cases you are responsible for the plugin implementation, which includes all invocation code. If using jQuery, making sure to use noConflict mode if also using Prototype JS (which RackForms uses for many operations).
Custom Body onload Code
Code placed in this block will execute in the onLoad body element.
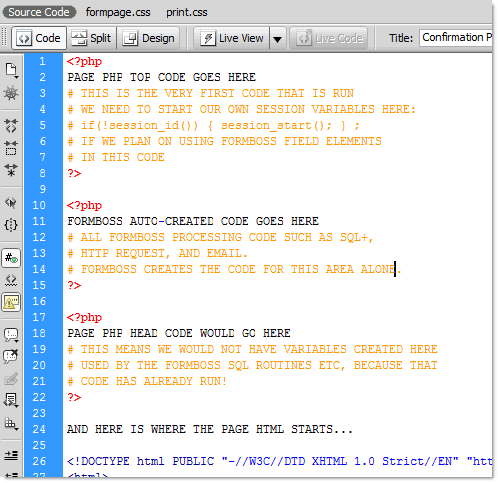
Page PHP Top Code
PHP Top Code
This code will be inserted before any other page code is run, including all RackForms generated PHP and HTML code. This code must be wrapped in proper PHP tags, which is why you will notice the Insert PHP Tag convenience item located directly below the PHP Head Code text area box.You can use the code section in the part to query a database to hold values which will later populate field items, perform your own internal code routines--basically anything you need can go in this section, so long as it's valid PHP and wrapped in php script tags.
This can be especially important for Confirmation pages and the HTTP Request module, as the code inserted into the Page PHP Head Code section runs after the HTTP Request as finished, whereas the code in this field, the Page PHP Top Code, runs before. This means you can create custom variables that your HTTP Request can use for processing.
This visual should help you distinguish between the different code blocks and where they will end up on an exported page:
Example of using Page PHP Top Code to Capture Field Values
Let's say we have a calendar field that we want to grab the value of and convert the default format we've chosen into a UNIX TIMESTAMP value, then INSERT into this new value into an SQL+ call.
To do this we need to capture the value of the calendar field on our confirmation page before it gets to the SQL+ routine. The Page PHP Top Code section is the only location this is possible, because the code in the Page PHP Top Code runs before anything else, including our SQL+ call.
Before we get too far, let's create a table to hold the result of our SQL+ Query:
CREATE TABLE YOUR_DATABASE_NAME.dates(
`date` VARCHAR (20) DEFAULT NULL,
`timestamp` INT (11) DEFAULT NULL
)
ENGINE = INNODB
CHARACTER SET utf8
COLLATE utf8_general_ci;
Now we'll create a form with a single Calendar field set to Multi-Field Numeric American.
Create a confirmation page and place this code in the Page PHP Top Code section:
<?php
// start our session
if(!session_id()) { session_start(); } ;
// create an array of the calendar fields
$r = explode('/', $_SESSION['qs']["{$_SESSION['entry_key']}"]['text1']);
// run mktime with our separated items to create the new timestamp.
$mysql_date = mktime(0, 0, 0, $r[0], $r[1], $r[2]);
?>
Now create an SQL+ module and place this into the SQL Code box:
INSERT INTO dates (date, timestamp) VALUES (?,?)
And this into the Variables List box:
text1, ${mysql_date}
When we run this form, we select a data value from the first page, then submit. When the confirmation page first loads, the first thing that runs is the Page PHP Top Code, which starts a session, runs explode() on the RackForms $_SESSION[] variable holding the value of the calendar field, then creates a PHP variable $mysql_data, which holds the output of the mktime() function.
The key then on the SQL+ side of things is that the variable we created, $mysql_data, can be used in the Variable List of our SQL+ call! Because this variable contains the newly created TIMESTAMP from the Page PHP Top Code, it INSERT's into the database same as any other variable.
You can download the XML job file for this example and try it yourself.
Page PHP Head Code
PHP Head Code
This code will be inserted just after the internal RackForms session creation routine and P3P header. This code must be wrapped in proper PHP tags, which is why you will notice the Insert PHP Tag convenience item located directly below the PHP Head Code text area box.You can use the code section in the part to query a database to hold values which will later populate field items, perform your own internal code routines--basically anything you need can go in this section, so long as it's valid PHP and wrapped in script tags.
Custom Redirection Example
You may run into a situation where you need to redirect the user to a new page after some code has run in this area. For example, you could be creating a login form that checks credentials, if they match, we want to send to user to a new page. Typically we can handle this with a PHP header("Location: some_url.php"); call, but for forms that are included into a page using the iFrame technique, this will not work, as only the iFrame would populate with the new page content.
The solution is to use a JavaScript based redirect which will ensure the entire page contents is redirected to the new page, not just the iFrame. Below is a full example of code that checks a database for user login details, and based on whether they authenticated or not, sets a flag to echo out the JS redirection code.
<?php
// connect to db
$db_vendor = 'mysql';
$db_mysql_socket = '';
$db_hostname = '127.0.0.1';
$db_catalog = 'delivery';
$db_mysql_port = '3306';
$user = 'RackForms';
$pass = 'test';
$dsn = $db_vendor . ":unix_socket=" . $db_mysql_socket .
		";host=" . $db_hostname . ";dbname=" . $db_catalog .
		";port={$db_mysql_port};";

// create db object
try{
   $dbh = new PDO ( $dsn, $user, $pass );
   $dbh->setAttribute ( PDO::ATTR_ERRMODE, PDO::ERRMODE_WARNING );
}catch(PDOException $e){
   die($e->getMessage());
}

// assign variable values
$email = $_SESSION ['qs'] ["{$_SESSION['entry_key']}"] ['CustomerEmail'];
$pwd = $_SESSION ['qs'] ["{$_SESSION['entry_key']}"] ['CustomerPassword'];

// create query logic
$sql = "SELECT ProfileID, CustomerName FROM CustomerProfile
		WHERE CustomerEmail = :CustomerEmail AND CustomerPassword = :CustomerPassword";

try {
   $stmt = $dbh->prepare($sql);
} catch (PDOException $e) {
   echo $e->getMessage();
}

// bind values to our prepared statement
$stmt->bindValue(':CustomerEmail', $email, PDO::PARAM_STR);
$stmt->bindValue(':CustomerPassword', $pwd, PDO::PARAM_STR);

// execute the query
$result = $stmt->execute();

if ($result) {
   $row = $stmt->fetch (PDO::FETCH_ASSOC);
   if($row){
	  // set a session var for logged in users
      $_SESSION ['logged'] = 'true';
      // collect vars from query if needed
      $user_name = $row['CustomerName'];
	  // set a flag that the user has logged in, use the redirect code below
      $pass = 1;
      // redirect to the success page
      // header ( "Location: http://something.com/admin/" );
      // exit (0);
   } else {
      header ( "Location: page0.php?fail=1" );
      exit (0);
   }
}
?>
<?php
// if the user has logged in, redirect using JS to the correct page
if($pass) {
?>
<html>
<head>
<script type="text/javascript">
function redir() {
	setTimeout("window.open('http://something.com/admin/', '_top', '', false);", 1000);
}
redir();
</script>
</head>
</html>
<?php } ?>
Page PHP Header Template Code
Code placed in this text area will display immediately before the first html body element, and after the closing head tag.
Page PHP Footer Template Code
Code in this text area will run immediately before the closing body tag.
Page Properties
Page Layout
Free Form or Sortable page, can be changed at any time and will remember field positions.
Field/Bucket Snap
In Free Form layouts, how many pixels each move increment is snapped too. Set to 1 for no snapping.
Page Export Mode
Important! Please be sure to use caution when using the various export modes, as anything but the default 'Full Export' may cause issues in various cases. For example, using Calendar fields or AJAX logic is not supported, as well as any logic that requires the JavaScript Head Code block to be present.
Full Export
The default setting of Full Export means when we save the job all elements needed to make the page 'self-sufficient' are included. This means <HTML> and <BODY> open and close blocks, doctype, page title, and other related elements.
No HTML and BODY
If we chose No HTML and BODY the form is exported without these tags. This is used for instances when we wish to directly include (using PHP's include function) RackForms output into a larger page where repeated use of HTML and BODY tags, while technically possibly, is not clean or XHTML standards compliant.
Of course it must be said that as RackForms relies on several helper files to submit a form request, the usefulness of this feature is generally limited to pages that are self-contained--That is, a page which submits to itself, if at all. If we follow this guideline we can easily create login pages, pages that call AJAX functionality, pages that call the Query module to return a database result set, and so on.
In short, we can leverage the power of RackForms in terms of creating complex logic for us and then combine these self-contained building blocks into a larger page.
Builder Core Mode
The third option is for Builder page's only, and is used to strip Builder output of ALL page formatting, only outputting the raw HTML of the repeated template (that is, ONLY the content included in the Repeater template code). Once again this is useful for integrating such output into a larger page structure where we only wish to have the core output of the repeater, not any related style or page code.
Of course when using these output modes most styling tasks are left to us. A good hint in this regard is if we wish to style our Repeater element when using Builder Core Mode, we'll want to copy the styles defined for us in the Page JavaScript/CSS Code > Basic Repeater Style For Builder Pages helper code, pasting them inline into our Repeater template.
That way our style data is left intact, while everything else is removed from the final output.
Please note using this method on standard form pages will include a <form> tag with the output, which may not be desirable in most cases.
Form Fields Only
This output method only exports
raw form field code and a "wrapper" div to contain them. No tags of any sort are included, which also goes for <form> tags.
This method is the preferred choice for creating larger jobs that want to include pages within them, such as for navigation elements and other template tasks.
PHP Head Code Only
This export mode only outputs the value entered into the PHP/ASP Top Code box. This is handy for creating pages that will be included via PHP's include '' function call. For such cases we're only interested in raw PHP code.
PHP Head Code & Include On Every Page Of This Job
Use this output mode to quickly define and apply this page's PHP Top Code block to every page in the job. This is a very useful option for applications where where have the same code needed for every page, such as a secured form that checks a login session ID.
IMPORTANT: Prior to Build 870, for technical reasons any page marked as PHP Head Code & Include On Every Page Of This Job must not be the first page of the job.
IMPORTANT NOTES:
The code we include for any page that uses this Export Mode is included in the child page using a standard PHP include_once block, which is itself wrapped in a file_exists().
Further, and perhaps most importantly for your implementations, this code is included before any other page code, including the child pages PHP Top Code block.
Finally, all code we add to this block starts with if(!isset(session_id())) { session_start(); } This means we do not need to add a session start block to any of these included pages.
Page Caching Mode
This feature allow us to define how submitted form data is displayed on multiple viewings of that page. If set to Default, form field data is saved and displayed when the user leaves and then revisits the page. If set to No Field Population, form data is still saved, but not displayed when the user revisits an already filled out page.
The most common use-case for No Field Population are forms pages that are part of a larger application. Consider: A user starts a form for a common task, such as a safety checklist. They're interrupted in the middle of this task, which happens to span several pages. Any page they previously filled out will refill submitted values when that page is revisited. In almost all cases this is the desired behavior. It would be quite inconvenient for users to constantly need to reload data. However, if, in this example process, the user filling out the form is no onto a new safety checklist, say, for the next day, all previous data is retained, which would be undesirable.
Page Encoding
In many instances you'll find some JavaScript driven items do not work properly when the default UTF-8 is used. For these items using ISO-8859-1 is advised. For example, the British Pound sign (£) may not display properly when using a JavaScript function to populate a form field item.Page Language
Select the language this pages uses. Defaults to US English.
Form Snap
Off by default, this allows you to have the page snap to the top of the form on load. Useful if you have a large page layout who's submit button is only accessible by scrolling down the page. When a user is directed to the next page, the form will 'snap' to the top of the RackForms form, where if no snap was enabled, the user would be stuck at the bottom of the page and would have to scroll up.Please note we have two types of snap, current page and parent:
- Current page simply means a stand-alone page will snap to the top on load.
- Parent snap means if the page is embedded within a larger page via an iFrame (which is of course very common), we will snap to the top of the parent page, not just the top of the form.
We may have times when we want a page embedded in an iFrame to just snap to the top of the form page. For example, we have a large page where the form is located below the main scroll height of the parent page. In such cases simply select the first snap option, Snap To Top Of Page. This will scroll the page to the top of the form, not the entire page, making sure the users isn't confused when the page loads.
Page Title
The name of the Page if using forms in a stand-alone manner. That is, if you create a form where you use the form as a stand-along page, this will become the page title. However, many users will elect to insert forms using the iFrame method, in which case this field will have no effect.Page Meta Description
The HTML meta description of this page.
Page Meta Keywords
Any page keywords you would like this page to have.
Page Name/Page Action/On Fail/On Success
The actual names of your exported php form pages and support files. These must include .php.RackForms Page Naming
RackForms makes the task of form creation as easy as possible by automatically naming the various pages used to create your forms. For most users this is a good thing, as even the most basic RackForms forms consists of several files. That said, RackForms is also a professional level tool that gives advanced users total control. The end result is a hybrid model where page naming in RackForms is something most users simply do not need to be concerned with, but pro users can get into if need be.
Page naming is not especially tricky but does take some getting used to. For instance, not only does RackForms create and name the .php form page, it also creates an XML validation file (which must be named the same as the .php form file), as well as a "_process.php" file which manages the form processing tasks. In short, it helps to know what files RackForms is creating as this will make naming them easier.
Where Page Naming comes into play and possible issues...
For all users, RackForms automatically managing the naming of your form files generally works fine, but when creating complex forms with multiple pages you may inadvertently "trick" RackForms into thinking the 'page flow' is different than what it should be.For example, their may be situations that where you create a series of form pages, then create a confirmation page, then add more form pages, then delete the confirmation page.
If you perform these steps, the automatic page numbering system that RackForms uses to route your form pages from one page to the next may be 'broken', in that the pages after the confirmation page will not be numbered correctly in relation to the pages before the confirmation page, which is now gone. The end result is your form will no longer process entries all the way through, as at the point where the chain is broken, and you will receive a missing file error.
Unfortunately, the RackForms page naming system (which is based on incremental numerical values) simply cannot handle all work styles and production workflow's, thus it will be important to make sure the entries in the Page Name, Page Action, On Fail, and On Success text boxes make sense for your form.
It cannot be stressed enough though, that in the vast majority of cases you simply do not need to worry about page naming. If you ever do though, below is an explanation of each field:
Page Name
When you 'view' a form page, this is the name of the file you're loading. It contains the html markup for your form page, as well as PHP logic for handling security and other tasks.What's important for naming is by default the file is named as: pagen.php, with n being the page number. For each subsequent form page you add, be it a form or confirmation page, the n is simply incremented by 1. However, as stated above the pagen.php file is not the only file created when you build a form. For every pagen.php file there are two other files created: pagen.xml and pagen_process.php.
pagen.xml is the xml file used for JavaScript validation. It must be named the same as the php page but with the .xml extension. You do not need to worry about the actual naming of this file though, as it simply takes the value of Page Name and adds the .xml.
pagen_process.php is the file used to 'process' a form page after it's been submitted. In contrast to the .xml file, you do have control over the name of this file. This is a vitally important file which takes us to the next text field in the RackForms editor:
Page Action
You'll notice the default value created by RackForms for this field is the Page Name with an underscore and the word process, followed by .php.You can name this file whatever you like, though the default of simply taking Page Name and adding _process.php is probably going to be the easiest to manage in the long run.
It may help to think of this file as the one that RackForms 'hands off' the information collected on pagen.php to be processed.
The next two fields, On Fail and On Success, are also vitally important as they tell the _process.php file where to go in the event the form submission was done correctly or not.
On Fail
If the user fails to fill out the form correctly per your requirements, the On Fail page will load. If you think about this, the On Fail page should simply be the last page they tried to fill out, which is going to be the same 'page' your looking at in RackForms at that moment. That's why you notice the On Fail field is the same as Page Name. If the form submission processing fails, go back to the page they were just on, RackForms will handle all the error codes and messages for you.The reason why you can edit this field at all is that advanced users may want to limit the number of tries a form can be filled out, create their own error pages, and so on.
On Success
Conversely, the On Success page should be where we take the user if the form submission was a success. You'll notice that by default the value of this field is simply the Page Name from above but with an index that's one higher. For example, if you current page is page1.php, the On Success page name will be automatically set to page2.php.If you have a multi-page form, this should be the name of the next page in the sequence. If you are going to a confirmation page, this should be the name of the confirmation page.
As an example...
On a simple two-page form, RackForms names the first page: page0.php, then when you create a confirmation page, it is automatically called page1.php. All page naming is handled for you, including the .xml and _process.php files, as well as the On Fail and On Success pages. If you look at the job folder, you will see the following relevant files:page0.php
page0_process.php
page0.xml
page1.php
page1_process.php
page1.xml
One Final Note On Page Naming...
Because the vast majority of your page names will be just fine when left to the default behavior, that is, leaving RackForms in control, the only real issue you'll run into is having the change the index number of a page(s) when you remove a confirmation page that is between two form pages (which should hopefully be a relatively rare occurrence, as confirmation pages should always be the last thing added).For example: let's say you had pages: 0(form),1(confirmation),2(form),
And then
removed page 1(confirmation). If you do this, page 1 (old page 2) is still named page2.php. This is a problem because page0.php will still have page1.php in the On Success field, something that clearly won't work, as we no longer have a page named page1.php, only page0.php(form) and page2.php(form).
To fix this we need to change the Page Name of page2.php to page1.php.
In these cases we simply need to update the numerical indexes, something that RackForms makes very easy. When you type in the Page NameCustomPageProcessCode/span> field you'll notice the values in Page Action and On Fail automatically cascade down to match the value of Page Name. If you prefer to only change the Page Action or On Fail individually, type directly into that field.
Thus, we would select page2.php (the bottom page), and in the Page Name field, change the 2 to a 1. This will automatically update the Page Action and On Fail fields for us, and now our form will work just fine.
Lastly, your page naming should work from top to bottom. The top should start at 0, each page down should simply be 1 higher. This is the default RackForms behavior, and works perfectly fine in just about every situation.
CustomPageProcessCode
This setting lets us define under what circumstances this page should be skipped. It's usually easiest to use the Page Condition Wizard. If we do skip this page, we simply fall through to the next page in our form's sequence, as defined by the On Success property.
Important: Please note this setting bypasses the 'Page Not Required / Allow Direct Access?' option in Form Properties. We mainly do this as a convenience, as if you're setting a skip condition, then we're implicitly allowing the page to be skipped.
Page Condition Wizard
This wizard allows us to set under what condition this page should be skipped using a simple GUI.
Custom Page Process Code
This block will inject any code we enter into the forms _process page, just before the page redirection logic. Full token support is included, which means we can process any form field, session element, or most importantly, POST/GET variable our standard form page delivers.
The most common use of this field is to gain access to the usually hidden _process page the RackForms page submission process uses.
To help understand what this means, consider having a form page called index.php. When we build this form, RackForms will also create:
index_process.php
index.xml
The XML file is used for page validation tasks, and is not something we need to modify.
The _process page is used to process and save the form data a user has submitted. In technical terms, the _process page, defined in the Page Action property of the page, if the HTML <form> elements ACTION property. That is, when we press the submit button this is the page we visit next.
The trick is this page is never something your user sees. The page simply collects the form field data from the previous page, saves it into session variables for future access, and then redirects to the page we define in On Success. It is, quite literally, a way point on our route to the next form page.
Thus, while not something a user views, it can be very useful for custom coding tasks, as this is the only page that receives the direct POST or GET variables from a form page submission. That is, if we ever need direct POST or GET access to the form page, this is where that happens.
The most common use for this feature then, will be for advanced users who are creating dynamic or custom form controls that are outside of the standard RackForms work flow. For example, perhaps you've created a custom set of INPUT elements based on a database query. You want to save the submission of these items in a standard confirmation page, but in order to do so you need the direct POST data after form submission.
Another common use will be when we need to directly inspect a form fields saved value. Key to this process is we can grab any form element using the fields Name/Value property prepended with a dollar sign. For example, if we have a text field called Name, we can use the PHP variable $Name as in:
if($text1 == 'Sample') {

    header("Location: http://www.yahoo.com");

    exit;

}
We can even create custom errors for the form to process by adding this code after our error condition:
$error = '1'; $valError .= 'Text is required.<br/>';
Custom PHP Processing Code Hook
For each type of form field our page contains, we can attach an inline function or callout to a custom function. The code runs during the processing stage of a forms submission, and will permanently affect the forms fields value. This code can perform simple actions like make all letter upper-case, or more complex operations such as a custom validation task. We have two types of calls that can be made:
1. Inline - These call general use a built-in PHP function to perform work. A good example of this class of call are any of the PHP string manipulation functions, such as strtoupper(), ucwords(), and so on.
For example: We'll call PHP's ucwords function to make all text in this field upper-case:
ucwords($val);
Please note in this and the next case, we do not wrap the code in PHP open and close blocks. We also need to include the trailing semi-colon.
2. Function Call - Function calls work in conjunction with the Custom Page Process Code block to allow for more complex processing. In this scenario we call to a function in the format of:
uc($val);
Note the format is the same as the Inline style, only now we're calling out to a custom function. This function is defined in the Custom Page Process Code block, which means should we omit that definition, the page processing will fail. As a simple example. this function call works with the example above. That is, we're defining a function called uc, then within the body of that function we're performing some work which will alter the fields value:
function uc($val) {
  return ucwords($val);
}
One final point: You'll note the code above uses $val for the value of the form field that will be processed. This is required. The name that represents the value of our form field must always be $val.
Show Error Text
If checked, JavaScript validation messages will be shown to users along with the error field highlight if the style allow for them. This is helpful in cases where an error may not be obvious, such as Password fields that need to match each other. However, you may find the error text doesn't match your forms style, which is why this element is switchable.It's important to note that not all error styles and layout combinations will show error text. For instance, Sortable layouts will show error text, but not sortable layouts in Table Mode. This is because by default table mode layouts are compacted along a grid like pattern, leaving no nature space for cleanly displaying error messages. In such cases it is advised to simply use the Helper Text field to give users the proper instructions on how to fill out the field.
Show JS Alert
When a user hits the submit button of a form with errors a JavaScript alert box will either show or not based on the value of this checkbox.Default JS Errors
When a user activates a field and then leaves it, a client-side (JavaScript) check is performed to see if the field has been filled out correctly, 'correctly' being dependent on what your set criteria for that field is. In many cases you will want to customize the error behavior of RackForms, the following paragraphs explain some basic concepts in this regard.When you set a field as required by clicking the Required checkbox, the default behavior is to simply turn the background around the field element to a light yellow. You can however, display an error message to the user by checking the Show JS Text checkbox in the Page Properties area. By default, this error message is shown in the format of:
You must supply a {field_name}
With {field_name} being the Name/Value property of that element. This format works fine in most circumstances. However, you can also show a custom error message to the user. To do so you must uncheck the Default JS Errors checkbox. At this point you have a choice on what to do next. If you leave the Validation Error Message box blank, you will show a default error message of:
Please check field for possible errors
If you place a value into the Validation Error Message box, that will be displayed instead.
This means you do not need to rely on RackForms to create required field validation error messages for you, you can create custom ones.
It should be noted that this error handling behavior only applies to users leaving field blank or unchecked. REGEX validation is slightly different, in that for those types of errors you always use the value of the Validation Error Message box.
JS Error Image
If you select a color form this box a small error icon will display next to a field that had been ruled as invalid by the JavaScript validating engine. This only works for sortable pages.JS Error Color
This property sets the background or field outline color of any elements marked invalid per your form fields validation settings. For example, if you mark a field as required and the user selects this field and then leaves it without setting any value, the area around that field elements will be highlighted with this color.Use Error Color
This option lets us disable the error block color. This is handy when we have a complex background for our forms, or when we want to create a custom error style, such as turning the field elements a different color, and so on.Please note however that as of Build 683 this box must be checked when using the Field Highlight JavaScript Error Display Type display type.
This option can be unchecked to remove the line from the Simple Icon Notice from the JavaScript Error Display Type selection.
Required Field Color
This value controls the color our required field elements Required Field Text value displays as. The default is a bright red, though other values may work better for different styles.
Required Field Text
Defaulting to an asterisk (in the HTML entity format of *), this value is shown to the user next to all required fields on the page. This value can be any valid HTML, though please note the HTML will always reside within a SPAN tag.
JavaScript Error Display Type
This option lets us set the appearance of our JavaScript (client side) error checking notice.The default is Field Highlight, which means the offending field is outlined in the color you specify in JS Error Color. This mode is our default as it takes the smallest amount of space in our form layout.
Block Highlight surrounds the entire form element (including label) with a div of the color specified that is set in JS Error Color. This method is a great choice for sortable pages.
Simple Icon Notice places a small warning icon next to the offending field, as well as a line, colored per the value in JS Error Color, connecting the field item and the icon.
jQuery Validate uses the library of that name to provide a professional validation solution.
It's important to note that some error styles will work better out-of-the box than others depending on which layout mode and options our form has. The options we set for the field item also play an important roll in determining the final look and feel of our validation solution.
It's also important to note not all validation methods will display text notices to our users. For example, The default error display mode in RackForms, Field Highlight, never shows error messages for specific fields, whereas jQuery and Block Highlight do.
For example, in the new Simple Icon Notice setting, unchecking Use Error Color removes the line that connects the form field and the error icon. For text fields this can be a very pleasing effect, but not very effective for radio and checkbox items, as the error icon will seem to float away from those fields.
A second example is that we do not show error messages when in Free-form or table layout mode. This is because in these layouts spacing between elements is key, and we sometimes cannot afford to have extra content scattered in our design. Thus, RackForms takes the safest approach possible and only shows the error messages and other decorations if the layout can safely accommodate them.
The colors we use will make a big difference in the look of our solution. By default the JS Error Color setting is red to work best with the default error style of field highlight. However, this will not look as good as a light gray if using the Simple Icon Notice style.
That said, the default settings will generally work best across the wide variety of form layouts we create, though we can always experiment with various colors, options, and so on.
The most important consideration then is simply making sure we test our forms validation settings to make sure users know how to effectively and quickly remedy submission issues.
Default Required Field Error Message.
This setting defines what message the user is shown if they fail to provide a required value for a field.
JavaScript Popup Window Error Message
The message that displays to our users if an error is triggered.
Use Background
If checked, RackForms will place any image you upload* by clicking the Upload Background Image button into the form as that pages background image.APACHE UPLOAD ERRORS (uploaded images do not show up)
* There is a known compatibility with some Apache Web Servers and mod_security when trying to upload images. A simple workaround is available, which you can find here.BG Layout Format
Choose between None, Repeat X, Y or Both.
Analytics & Tracking Properties
Google Analytics Account ID
The Account ID of your Google Analytics account. This is often referred to as your "Property ID". It can be found under the Admin section of your Google Analytics account.
Google Analytics Domain
The domain name of the property being tracked. This value is generally your raw domain name, that is, no http:// and no prefix. For example, rackforms.com, yahoo.com, and so on.
Please note the shortcut link under this item, when pressed it applies the settings of this page to all pages in the job.
Page PDF Output Properties
Important Notes!
Excited to get to work with RackForms and PDF files? Please Watch this important video first!
Output Buffering: In order to use PDF Output your server must have output buffering enabled.
Output Buffering can be enabled in the servers php.ini file, even for most decent shared hosting plans. For example, GoDaddy shared servers allow users to define output_buffering in a file called php.ini or php5.ini located in the servers root directory.
Page Not Required: It's also important to note that your PDF page should almost always have the Page Not Required / Allow Direct Access checkbox checked, as described here.
RackForms will perform this step for us automatically when we enable PDF output, though if we run into issues with PDF pages not outputting
this is a good place to double check.
Page Size Notes: The default page size for PDF output is Letter. This is a good choice for most uses, but not all. Specifically, if your form page is over 975px high most PHP servers will fail during the PDF creation process. The solution is to select a larger Page Size value. A good first attempt is tabloid. The lower in the list we go, the larger the page size.
Full Page Backgrounds: If our PDF output includes a background image, we've got a few special items of note:
1. First, we almost always want to set our page margin to 0, found under: Form Style Properties > Page Margin. If using the Form Wizard, this step will be done for you.
2. Our source background image must be 96 DPI. For an 8.5 X 11 source, this means our final image pixel dimensions will be 816 X 1056.
3. Generally speaking, so long as our image is 96 DPI @ 816px X 1056px we can use the standard Page property to set our page size. However, we can, if needed, set custom sizes using the Custom Size X/Y values.
In general, these values should match exactly our page size values when using mPDF, and use 72 DPI measurements for DOMPDF. For example, at 72 DPI 8.2 X 11 paper would use the dimensions: 612px X 792px.
Form Wizard Output and mPDF: mPDF requires that images imported via the Form Wizard have a zIndex property of 0. This is done automatically for us by the Wizard, but should this ever be changed, resetting back to 0 will fix any laying issues.
Using images generated from Form Wizard imports: If we've imported a PDF page using the Form Wizard, any resulting background image will be scaled at 1.3335% to create an approximation of a 96 DPI image. Follow the items above to ensure the generated output matches the form preview as closely as possible. Generally speaking, for pixel perfect placement use DOMPDF.
Fonts: Small differences in the way fonts are rendered in the various PDF engines may create slightly different layouts in your final output. DOMPDF is usually best about maintaining the same look as your original form, whereas mPDF creates the nicest looking output.
The default font for DOMPDF and mPDF is Helvetica.
Processing Power And Import Type: Generally speaking, when using an image import form the Form Wizard, or any other large image, DOMPDF will produce the fastest results. mPDF, while creating great looking text output, may hang and fail to process with large image content. Thus, be very careful when using PDF output and mPDF for anything other than a background image uploaded using the Upload Background Image mechanism.
Enable PDF Output
If enabled, RackForms outputs the entire page as a PDF document using the output mode defined below.
PDF Output Mode
RackForms has several different PDF output modes. We can send the current page directly to the user as an inline PDF or download, save as a template page for later use, or have the current page generate a PDF file for later use based on the current page layout.
Simple Output Methods
Use these methods when we have no additional needs other than outputting a PDF file for the browser or as an immediate download. We have two options:
1. Direct To BrowserIn this mode the generated PDF file is presented directly to the user if the browser supports in-line PDF viewing. If not, a download prompt is created.
2. Download PromptIn this mode the PDF file is presented as a download attachment to the user. This is usually the safest option, as the user can save a copy, even if they do not have a PDF viewer at that time.
Manual Template Methods
Unlike the first option group where we're saying, "take the current page as send to the user as a PDF strait away",
we use these methods when we need to create a custom template for the PDF file and then save that PDF for later use.
These methods require two actions:
-
First, we add elements to the page in the style and positions we wish them to appear in the generated PDF file.
This content can include images, text, and most any standard HTML. This could also include standard form fields, which typically
have a value set for the Default / Hidden Value property. It is this process that gives the method its name.
We add elements to the page and in doing so, we're creating the template by which the PDF file will be generated against.
-
Next, using Page Properties > On Success, we point a form page to this page, and then for the PDF template
page, point to another page. We do this as a the Manual PDF Template methods are simply a stepping stone of sorts,
in that users will never "see" our template page, RackForms simply stops off to render the page content, then automatically
redirects to the next page in the sequence defined by Page Properties > On Success.
The output of the template process comes into play in the submission page of the job, where the type of output is defined by output option we select, of which we have two:
1. Save For Email / SFTP Output Using This Page As The Template
This output mode takes whatever page we have set for the page's On Success setting, and uses that as a template to create a PDF which we then make available via the token shown below. This mode is similar to Render As Email Template Upon Submission, except that mode uses the current page and generates a PDF from it, whereas this mode requires a template page.
Use this mode to work in conjunction with the RackForms Email Setting: Include PDF File Attachments?. So long as we're operating in this mode, and so long as the email item has that option checked, the email output will include the PDF file generated on this page as an attachment.
2. Save For Database Output Using This Page As The TemplateThis mode allows us to save the content of the PDF file from this page for later use in an SQL+ item. We access the PDF file data as raw binary code via the token:
F{PDF_TEMPLATE_DATA} (When Writing To MySQL and MSSQL)
That is, to save the PDF we write to a binary field database table, and in our Variables box, include that token in the correct column slot.
Important: PostgreSQL users must use this token for PDF output:
F{PDF_TEMPLATE_DATA_PG_ESCAPED}
Automatic Template Methods
These option options differ from the manual template methods, in that instead of us creating the template page from
scratch, RackForms will automatically convert the current page into a PDF upon submission, saving it for later use (email, database, etc).
The downside is we have no control over the look of the page aside from our base formatting. In many cases this is just fine,
but could be an issue for output that doesn't translate well from web form page into final document,
such as tax forms, legal documents, and so on. In those cases the Manual Template Methods would be a better fit.
It's also key we note two important limitations of this mode:
- First, for the save for email method, we cannot, at this time, save multiple pages as one single PDF. That is, if we enable this mode for several form pages, each form page will be its own separate entity.
- Similarly, when using the database output option, only one PDF page can be saved. That is, the token, (described below), we use to send the PDF data to the database only captures the first, or if multiple pages are set, most recent page saved to PDF.
Render As Email Template Upon Submission
In this mode we take the current page and, upon the user pressing the forms submit button, render the page and return it as output for an email items Include PDF File Attachments? option.
This option is very handy for workflows where we need to capture the original forms output without changes and send it along as an email attachment.
In earlier versions such output required us to create a separate PDF template page and hand-populate it with the existing values for each field we wished to render. It's key to note that in some cases this may still be the desired method, as that way provides total control over the finished PDF document. This is especially important when we consider not all PDF engines create the expected output when fed a raw form layout.
Render To Database Upon Submission
Similar to Render To Email Upon Submission, this mode takes the selected page along with all included data, and upon submission,
saves the PDF data for inclusion into a database INSERT call via the token: F{PDF_TEMPLATE_DATA}
The key difference with this method and Save For Database Output Using Template Page, is the latter requires a PDF template page to determine its output, whereas this method simply takes the existing page and generates a PDF from it.
As noted above, it's key to note this method cannot save multiple pages of PDF files. Only the most recent page that has this option set will be saved to the PDF_TEMPLATE_DATA token.
PDF Rendering Limitations And Hints
One key limitation we must be aware of when generating PDF files is they will not render iFrame content. This type of layout is very common in application forms, where we embed Builder page content within form pages.
To address this, set the builder and form page's PDF Output Mode to Render As Email Template Upon Submission or Render To Database Upon Submission. Next, set the Builder page's Page Properties > On Success attribute to the submission page of your job. Finally, set the form page On Success attribute to the Builder page's name.
When we submit our form page, the form page will submit to the builder page, which will in turn submit to the submission page. The email we receive will have both PDF files as attachments.
PDF Output Library
By default RackForms ships with DOMPDF. However, we also natively support the TCPDF and/or mPDF libraries if they're installed on your server. Please see below for advantages and disadvantages of each.
Allow Remote File Access
This setting only applies to the DOMPDF library. When disabled (default), any attempt to load an external resource, be it an image, font, or any other remote content, will be blocked. Setting this to Yes will allow such content to load, though at the potential loss of security.
A good example of turning this to Yes is for the google-maps-static example job. Here we need to pull an image from the Google Maps API, which would be blocked without this being set to yes. For any other uses, please be extra sure the content being fetched is from a trusted source.
Enable PDF Encryption
When enabled, will encrypt the PDF output with the passwords defined below.
User Password
The view only permissions for this encrypted file.
Owner Password
The read/write permission password for this file.
PDF Permissions
The permissions any encrypted PDF receives. Please note restrictions on Print can be easily defeated with simple work-around such as taking a screen-shot of an open document. Thus, please use caution with this setting, as the values used do not guarantee they'll be followed.
Full Page PDF Hints And Tricks:
As an online form generator the primary function of RackForms is to create forms that match your editors display when viewed within a web browser. One key challenge arises when converting layouts to PDF however, which is that as with any conversion the end results are not always a direct match for the original.
For PDF generation this most commonly arises when building full page, multi-page output. Thus, this section offers a few hints to help you generate the best output with as little work as possible.
When building full page PDF templates follow these rules and processes:
- Page Properties > Page Layout Mode should be set to Sortable List
- PDF Output Library Should be set to: DOMPDF
- At the top of Page PDF Output Properties click the Apply Full Page CSS To Page JavaScript / CSS link. This adds critical CSS rules that ensure our page layout matches as closely as possible to our editor display.
-
If our layout requires multiple pages or pages with full page background images:
- On the left-hand side of the editor next to the text "Toolbox" you'll find a gear icon. Click this icon and within the Editor Options window, make sure
Style Previewis checked. - Next, add a Bucket to your page. Each Bucket will represent a single page of the final PDF.
- To this bucket add an Image module, then set the proper background image for that item. Critical: This image should ideally be 96 DPI (dots per inch).
- Resize the bucket by dragging at the bottom and left margins to be roughly the dimensions of your placed image.
- Add that page's additional items within this same bucket.
-
For each additional page (if needed):
- At the top of Page PDF Output Properties click the Add Portrait PDF Page Break To Page link. This will add a Code Block item that contains HTML to create a page break in the PDF.
- Drag the newly created Code Block element below the Bucket.
- Add a second Bucket to the page, and repeat the above process for image and items.
- On the left-hand side of the editor next to the text "Toolbox" you'll find a gear icon. Click this icon and within the Editor Options window, make sure
- It's a good idea to constantly build the PDF template page to check output quality. In particular, when we clicked the Apply Full Page CSS To Page JavaScript / CSS link we added styles to the page that make sizing the page in the final PDF easy, with the only real adjustment being expanding and shriking the bucket width to match the final output paper size.
- Finally, setting a lower value or "0" for Page Properties > Field/Bucket Snap can make placing items easier.
General PDF Requirements, Output Hints, and Tricks:
Requirements: RackForms ships with the DOMPDF library, we must download and install other libraries separately. For all methods we must have output_buffering enabled on our server with a value large enough to save the rendered PHP page in memory. If output buffering is not enabled or its value is set to low, we will get a message similar to:
Unable to stream pdf: headers already sent error
Output Buffering is required because to make the PDF process as streamlined as possible we capture the entire page in memory using PHP's output_buffering mechanism, then render out that chunk of data to the PDF engine.
While simple, the method requires that your servers output_buffering setting be large enough to store the full page of data (HTML, CSS, etc). If it's not, the error message above will appear. To fix this we need to contact your web hosting provider and ask them to increase this value, or locate your servers php.ini file and increase it manually.
From general testing a value of 40960 works quite well, or if needed, a value of On should suffice.
The TCPDF Library
The TCPDF libraries license prevents us from including it with the RackForms download, but we can easily pick it up from here.
Once downloaded, we'll place the tcpdf folder into:
rackforms/app/lib/pdf/
That is, the entire tcpdf folder sits in the pdf folder.
TCPDF Font & Image Sizes
By default TCPDF scales fonts and images used in our pages by an amount set in: tcpdf/config/tcpdf_config.php > PDF_IMAGE_SCALE_RATIO. The default value of 1.25 unfortunately outputs text that's far too small when using pixels as a font measurement unit.
Their are two solutions for this: we can edit the setting above to something like, .4 or .5, or we can modify the text in our forms to use point sizes instead of the native pixels.
We do this in the TinyMCE text editor via the font size drop-down, and by manually wrapping label tags in spans with styles like:
<span style="font-size:12pt;">Your Name</span>
We can also just set our font size to use points (pt) via the Field Style Properties > Font Size (px or pt) field.
TCPDF Form Field Support
One powerful feature of TCPDF is its ability to transform HTML form field elements into PDF form elements. The only trick with this process is just as text size transformations when going from HTML to PDF need to be considered, so to are our form fields in RackForms in need of tweaks to have them display properly in PDF format.
Generally speaking, this simply means that text and select items need to have a size="" attribute added, and text areas need cols="" and rows="" specified.
In other words, TCPDF doesn't support most CSS properties; RackForms uses CSS properties for form field styling. This means we must supply standard HTML size properties for form fields to display properly in PDF files.
You can see an example of this in the sample job: PDF Output > native-tcpdf under the Text Fields: Extra Attribute(s), JS, Event Code, etc setting, where we supply a value of: size="20"
The mPDF Library
MPDF features excellent CSS support and
does a great job of making the final PDF fonts look smooth and professional. It support Free Form and Sortable layouts equally well, and is thus a great choice for almost all output needs.
One area of caution however is to make sure that if you set a Field Height property in percentage points (%) for any text display field it may push other content off the page. Thus, when using mPDF it's advisable to stick with use px for any height definitions.
Advantages and Disadvantages Of Each Library
Generally speaking, TCPDF is more advanced when it comes to PDF features such as creating form fields, bookmarks, advanced navigation items, and so on, whereas DOMPDF and mPDF is much better at creating an
accurate representation of CSS/DIV based layouts (which is the native RackForms way of doing things).
This is because the latter libraries support most of the CSS 2.1 standard, whereas TCPDF supports a limited subset of CSS. Most notably, TCPDF, as of Version 5.7 does not support padding and float. Please see this link for more information.
In general for table rendering TCPDF seems to be a good choice, for DIV based layouts go to DOMPDF. It will help to use this to your advantage when designing pages: if you want to use TCPDF simply create a table-based layout in an HTML editor and paste into a text field in RackForms.
In general, for all libraries it's important to note that HTML and PDF output are very different animals, and just because something displays well on our browsers doesn't mean it will in PDF format. Be prepared to edit and tweak your HTML code to get the best results. In particular, TinyMCE text blocks will suffer from the extra <p> blocks added in TCPDF, it's thus best to use single returns only. Doing so will create HTLM which is slightly compact, but PDF output which looks just right.
It's also important to note that the fonts we can use differs by library. DOMPDF has a rather limited set of fonts it supports, which we can see at:
app/lib/pdf/dompdf/lib/fonts
In contrast mPDF has a better range of supported fonts, and in general, has a higher quality looking output.
Page Layout Mode Support
Because TCPDF doesn't have good CSS support, it does best when forms are in Sortable Mode. In contrast, DOMPDF does poorly with sortable mode, but quite well in Freeform Mode.
As mentioned above mPDF does an excellent job with all content.
Page Orientation
The page orientation setting, landscape or portrait.
Page Size
This sets the page size, but can be overridden using the Custom Size X and Y values.
Custom Size X
The width of the page size, in Millimeters. Please note this and the Custom Size Y properties are only valid for the mPDF library. This setting, and in particular Custom Size Y, is very helpful for page layouts where we get odd breaks in the form, where form elements each take their own page. By setting this value higher we can eliminate these page breaks and ensure the form elements stick together.
Custom Size Y
The height of the page in Millimeters. Please note this and the Custom Size X properties are only valid for the mPDF library.
Form Security
This section contains settings for controlling form access and security.
As of Build 695 Builder pages can also take advantage of these security settings, particularly with regard to the page login features. Do note however, that not all properties make sense for Builder pages, such as Entry Limit, so not all are supported.
Please take special note, the IP Limit fields will ONLY WORK when creating a form that sends results to the internal RackForms result browser via the Simple SQL field item. This is because the IP check relies on the existence of records in the RackForms fb_job_entries table to work. If you are creating a job that only send to email or SQL+, you must create a Simple SQL field item for these options to work!
Entry Limit
Set a number other than 0 to limit the number of entries per user-ip. Caution should be used with any IP based restriction, as it can be circumvented by simply switching ip's.
Entry Limit Duration
Select a value from the drop-down to permit when--if at all--a user can post another entry. Select Forever to permanently limit entry's to 1, or select from Day, Week, Month, or Year.
IP Limit Error Message
The message to display to a user who has reached the IP submission limit. The default text should suffice in most instances, though when you set a custom duration you may want to include this information to help the user understand why they cannot post again.You can use the HTML text editor to 'spruce' up this field, and this is recommended. However, please note that unlike other HTML editor fields such as Header and Body Copy that inherit text styles from the form body, you will need to explicitly set a text style for this field, otherwise the browser default font is used, which rarely looks professional.
Basic Form Login
The following is a description of all basic form login fields in RackForms.
Enable Basic Page Login?
This feature allows us to block access to the form unless a satisfactory username and/or password combination is provided. It can be enabled and disabled at will with this dropdown menu.
For standard form pages the login logic is active until the user provides a correct login. This login access is then valid for that form until they submit the form through to its confirmation page. At that time the SESSION element which has validated the login will be destroyed, and any subsequent visit to the form will once again require a login.
For Builder pages a successful login will remain valid until the browsers session is destroyed, e.g., they quit the browser.
Enable Persistent Logins?
If enabled, this option will allow a user to login once to a specific form, or once for all forms per browser session.
Please note this setting applies to
the Basic Page Login and Active Directory Login methods.
This feature is useful because the default behavior of the simple and AD (Active Directory) login system is to only allow one login per form submission. This is typically what we want for simple, one-off form submission tasks. Once the form has been submitted, the user is "logged out" of the form session. However, if we're building more complex applications this can be come problematic.
Specifically, imagine a scenario where we have two different forms, both of which we want to password protect, but both of which should be available to the user after the initial login. In this scenario we would select Yes - One Login Per Browser Session, as this would allow the initial logic (if it's successful), to authenticate them against any other form in our system that uses the simple or AD login system. Please note this will not be as secure, as the user will be authenticated for any form you've created in RackForms using simple login, regardless of password or name values.
This relaxed security concern is why we have a second option: Yes - One Login Per Form. This option will authenticate a user for a single form, or to think of it in RackForms terms, a single job. This way a user can login and submit a form as many times as needed, without needing to login each time.
Finally, it should be noted that for the ultimate in flexibility, we'll want to use a custom login job with specific security levels and users, as we'll find in the sample job: login-form-mysql.
User Name
As the name states, this is the user name a visitor would need to provide to the login form. The most important aspect of this field is it's not required. Should you leave this field blank, RackForms will create your form with just the password field present.
Password
This field, regardless if we supply a username or not, is always required. It's best to make this only as complex as the form requires.
Login Attempts Limit
Select from 3, 5, or unlimited. This system is session based, which means the users browser will be locked out if the maximum number of attempts is reached, but not after a browser restart. For maximum security it is recommended to use a more robust login solution such as the RackForms Form Persistence (Save and Resume Later) SESSION based system. It is for this very reason that the default value is unlimited, as we should not rely on this system for hyper sensitive forms such as financial data.
Login Message
This is the message that displays above the login form.
Login Error Message
Should a user supply an incorrect username/password combination, this is the message that displays to the user. This field, along with the next two, support HTML, though for consistencies sake it's usually best to leave these as plain text.
Login Attempts Error Message
Should a user supply an incorrect username/password combination over the limit specified in the Login Attempts Limit drop down, this message will be shown to the user.
Comma Delimited Accepted Domain List
Setting a value in this text area will force all form users to use the form from that individual or set of originating domains. For example, if your web site: coolexample.com should be the only place someone can use this form, place coolexample.com in the text area. Please note you should include the Top Level Domain (.com, .org, .net) and the hostname--For example rackforms.com.To find out your current domain, create a blank page and run this code on it:
<?php echo $_SERVER['SERVER_NAME']; ?>
For development purposes, you will often use localhost if your web server is on your local development machine.
If you need to include more than one domain, make sure to use a comma separator between each host and TLD!
Enable RackForms Logins
When enabled, checks the requesting users for an active RackForms login based on user name or group. If no association exists the user is redirected to the base RackForms login page. If the login attempt is successful the users is redirected back to the original form page.
Enable CAS Logins
CAS (Central Authentication Service) login providers are popular in higher education circles, and provide a fast, secure, and simple login process for users that spans multiple systems and endpoints.
CAS protects pages by stepping into and optionally interrupting the page load process if a security cookie is not present on the users machine. If not already authenticated, users are redirected to a CAS server location we define in the settings for this module, and are asked to provide valid credentials to pass the login check.
If users pass the login check they're redirected back to the originally requested page, and can now browse as normal until the CAS cookie expires or is manually cleared.
Login Scope Note - When enabled CAS authentication applies to all pages in the current job, meaning any time a page is requested and the current user has not been authenticated, they'll be redirected back to your CAS server.
Access Authorized User Data
When a user successfully logs in via CAS, the CAS server should return data we can access about the authenticated user.
We can access this data in RackForms via the tokens: F{CAS_User} and F{CAS_Attributes}.
CAS_User will be a string value of the user name of the logged in user.
CAS_Attributes should contain an array of values, the keys of which will vary depending on
your CAS server implmentation. For example, this could be a PeopleSoft Id, Email address, and so on.
To access CAS_Attributes values add this PHP code to any Code Block element:
<?php
$attr = FR{CAS_Attributes}; // Access The Logged In Users Attributes, If Present.
print_r($attr); // $attr Now Contains An Array Of Values, We Print Them Here To Show What They Are.
$auth_method = $attr["authn_method"]; // For Example, We Can Access The `authn_method`.
?>
Important: This code cannot be called from the PHP Top Code block.
Logging Out
To log out of a CAS session, add a Code Block element to the VERY TOP of a form page and add this code to the Raw Block Code section:
<?php
CAS_Logout();
?>
For a method that involves no Code Blocks and custom PHP, we can also redirect to any page in your job and include the query string:
logout=true.
For example: https://www.example.com/forms/grades/index.php?logout=true
Finally, we can always create a link to our CAS servers logout endpoint, for example, yourdomain.com/webauth/logout.
CAS Properties
The following is a description of all CAS fields in RackForms.
CAS Host
The location of the CAS server, which is simply the base URL of the site users login into. Please note while we can add a specific path in the url, for example, webauth.yale.edu/cas, we typically use the CAS Context field, described below, for that purpose. Thus, this field should usually just be the raw host name of the CAS server, e.g., webauth.yale.edu
CAS Port
The port the CAS server uses to communicate. Should almost always be 443 for HTTPS secure connections.
CAS Context
The path value or endpoint of the CAS server. As described above in the CAS Host section, this is simply the part after the formal host name, e.g., webauth. Thus, if our case server raw url is: webauth.yale.edu/webauth, the first part, without slash, webauth.yale.edu, goes into the CAS Host field, and webauth, again, without the slash, goes into this field.
CAS Access Levels
While the ability to gate a form behind a CAS login is useful, for full applications we'll want to extent this to also check access levels. In RackForms we have two user levels, View Submissions and Update Submissions.
We assign CAS rights at the page level, meaning any user trying to access a page must be a member of that group. Please note that because CAS authentication applies to an entire job, even if no level has been set users will still need to have CAS authenticated.
The first step in this process then is defining a list of users that belong to each access level. Once we've got our user list(s) defined we'll set the specific access level for each page in the job.
CAS Users - View Submissions
A comma delimited list of users that have the ability to view submitted
form entries for a given page. Technically, this list will be compared against the user's given CAS identity
as stored in the F{CAS_User} value.
CAS Users - Update Submissions
A comma delimited list of users that have the ability to view and update submitted
form entries for a given page. Technically, this list will be compared against the user's given CAS identity
as stored in the F{CAS_User} value.
CAS User Level Needed To Access This Page
This setting determines the inclusive page access level needed to access the page's content. We define each level's users in the previous two fields.
For example, if you has a user who's CAS Login Id was ssmith and we wanted that
user to have Update abilities in
our system, we'd add ssmith to the CAS Users - Update Submissions list,
and then for our update page, set this value to Update Submissions.
This would mean only users who belong to the Update Submissions list can access this page. It's important to note these access levels are inclusive, meaning a member of the Update group also has access to any page set with the View Submissions access level.
Finally, it's key to note these settings only gates access to the page, not to specific features and functionality within. Thus, when building applications we'll typically build out two sets of pages for our users – one as a read-only Builder form for display, and a second Builder page containing update actions.
Enable Active Directory Login
In addition to simple login and CAS, we can also tell RackForms to check a users membership to an Active Directory server. To use this feature we'll toggle the select item to Yes, then set the AD servers details in the window that appears, along with the users and / or groups you wish to provide access to this form for. Note that like CAS login, when set the AD check is performed for all pages within the job.
One useful feature when processing logins from AD is the ability to capture the user's basic information from the Active Directory login process. We can access these data using the following form field (F) tokens, which originate as the AD fields shown on the right. If the field doesn't exist the token will simply show as empty.
- F{AD_LOGIN_CN} -> AD property: cn
- F{AD_LOGIN_TITLE} -> AD property: title
- F{AD_LOGIN_TELEPHONE} -> AD property: telephonenumber
- F{AD_LOGIN_DEPARTMENT} -> AD property: department
- F{AD_LOGIN_EMAIL} -> AD property: email
Active Directory Login Manager
We can configure the AD login check to match against individual SAM Account names, or group names to which that user has membership. To set your access check properties click the Manage AD link to open the AD Manager window. For individual SAM account names, look for the box labeled SAM-Account-Name(s) and enter the user name or names we wish to provide access for. For group access we must first provide values for each of the required top boxes. When done click the Perform Group Lookup button. This will populate the group names known to the AD server in the bottom section of the window. Add add groups, click the checkbox next to the desired group name.
Form Is Accepting Entries
This box is checked on by default, but if at anytime you wish to disable a form, uncheck this box. The form will not load when a user visits the form, and a message (see below) displays informing the form is not active.
Non-Active Form Visitor Message
If you choose to disable a form, this is the message displayed to the end-user when the form 'fails'. By default the message is: Sorry, this form is currently disabled. It is advisable to provide a more detailed message for any disabled form.As with the IP limit field, you can use the HTML text editor to 'spruce' up this field, and this is recommended. However, please note that unlike other HTML editor fields such as Header and Body Copy that inherit text styles from the form body, you will need to explicitly set a text style for this field, otherwise the browser default font is used, which rarely looks professional. To add a font simply select the text and click in the Font Family drop-down menu of the TinyMCE editor instance.
Block Browsers Without Cookie Support
This option allows us to attempt to block (via JavaScript), users that have cookies disabled. Before we talk about the why, it's key to note blocked cookies can happen in two main ways:
If the form is stand-alone, or is hosted in an iFrame and originates from the same domain as the parent page, a user would need to have all cookies disabled for their browser. This is quite rare.
The second scenario, and indeed one that's far more common, is a form hosted on a third party server. In this case a cookie setting of "block all third party cookies" will trigger the blocking system.
The why is RackForms creates forms that rely on PHP Sessions; these sessions are in turn managed by Cookies on the users computer. Thus, if a user has cookies blocked, they will not be able to fill out the form properly. Thus, this setting, which is enabled by default, prevents such failed entries from occurring.
Please note as a last resort, RackForms will use a mechanism called SID via URL parameters. Thus, if you must support form submissions no matter what status the users cookies preference is, this may be a viable option. Just set this option to Do Not Block.
However, it's very important to note the SID method only supports basic form flow such as simple email or SQL items. It does not support most CAPTCHA methods (though it does work with Challenge Question Captcha), so please be careful if you disable this setting.
Page Internationalization
Global Page Item & Text Direction
Sets the HTML tags: dir attribute.When set to the default, all page items flow from left to right. When set to Right to Left, items flow the opposite, as in Arabic.