RackForms
v7.8.9
rackforms pro

Latest Release: Build 959 - November 6th, 2025

Home > Installation / Configuration Guides > RackForms Pro

Before you install RackForms, please read and understand the End User License Agreement.
IMPORTANT - Yes this is a long document, but please understand that doesn't mean the install process is complicated!
RackForms is an advanced piece of software, and by its very nature performs many advanced functions many other scripts simply do not. Every step has been taken to ensure RackForms runs great on a vast array of servers, and yours will almost certainly be no exception!
That said, the more time you take now on making sure you know all the ins and outs the software, the easier your installation process will be, and if something does come up in the future, the better prepared you'll be to manage such issues. That said, if you simply want to skip ahead to the install field descriptions, feel free!
*BREAKING NEWS*
Their is a known bug in Windows PHP 5.2.9 where the install will work, but you receive an
error in your Event Viewer > Windows Logs > Application as such:
Faulting application httpd.exe, version 2.2.11.0, time stamp 0x493f5d44, faulting module php_pdo_mysql.dll, version 5.2.9.9, time stamp 0x49dda2bd, exception code 0xc0000005, fault offset 0x0000249a, process id 0x56ae4, application
This is caused by faulty PDO extensions. To fix this error, you can either download an older version of PHP such as 5.2.8, or download this file and replace your php_pdo_mysql.dll and php_pdo.dll files in the ext directory.
GoDaddy User? Please Read!
Are you a GoDaddy + Linux web hosting customer? If so please check out this How to Install RackForms on GoDaddy video.
If you are a GoDaddy + Windows customer we have created a special install section just for you!
We also have a special help page specifically on GoDaddy database setup.
GoDaddy Preview DNS Note: The RackForms editor will not work if your site is using the GoDaddy Preview DNS feature due to a conflict in the JavaScript code the previewdns.com site uses. To use RackForms make sure your site is being hosted normally.
Finally, for best results with GoDaddy hosting it is strongly recommended that you edit your php5.ini file (rename the php.ini to php5.ini if you haven't already), and at the bottom, add:
[FB]
output_buffering = 4096
magic_quotes_gpc = Off
This will ensure maximum compatibility with RackForms.
General Installation Help Video
You may want to watch this install help video. We cover a basic installation, as well as have some fun 'breaking' the install process by recreating common problems such as database permission errors, then show you how to fix said problems.
Highly recommended as as substitute or compliment to the printed instructions below.
It is advisable to set aside at least 1 hour to devote the installation process. Many users will find the process takes significantly less time, others longer.
If you come across a heading that doesn't pertain to your set up, such as Microsoft SQL Server when you're running MySQL, you can always safely skip that part.
Most of all, be patient and have fun!
Free Direct Installation Help
We web developers are busy people, and the sheer number of server configurations and
SQL setups can present special challenges for an advanced application like RackForms. That's why we offer Free Setup and installation assistance for users who find themselves at an impasse when trying to install their software. It should be noted that this is a last resort, as we place your server security and PCI regulations ahead of all else. In some situations though, you simply want to have the software installed and move on to more important things!
If you want to have us install the software for you, we will need access to your cPanel or other server management software. We will also need access to your Database server in the form of user and password. Collect this information, and send an email to support@rackforms.com.
The only other requirement we have is that you place the extracted RackForms.zip file contents on to your web server, this way we can skip some FTP steps if possible for faster service.
The Install Process
There are a few considerations to make when installing RackForms for the first time:
PHP System Requirements
RackForms Requires a Web Server running PHP 5.1.4 or higher. Running the latest stable version, 5.2.8, is advisable. No branch of PHP 4 is supported, as RackForms uses Object Oriented Features specific to PHP 5.
Notes on PHP 5 and GoDaddy Web Hosting
By default, many 'GoDaddy Hosting Configuration 2.0' accounts are set to serve .php files with PHP 4, not the required PHP 5. As RackForms uses the .php extension, this means you may end up inadvertently trying to serve your RackForms install.php file with PHP 4, which will fail immediately with the following message:
Parse error: syntax error, unexpected T_STRING, expecting T_OLD_FUNCTION or T_FUNCTION or T_VAR or '}'
To fix this issue, please see here for a general description and here for the solution.
RackForms and magic_quotes_gpc
RackForms does not support servers where so called Magic Quotes are enabled. Most every hosting company already has this feature disabled by default, so no further action is needed. Most importantly, as of PHP 5.3 this feature is deprecated, and starting with PHP 6, will be removed entirely.
A simple check of your php config for the text magic_quotes_gpc will determine of you have this feature on. You can view your php config file by clicking the "PHP Info" link at the top of the RackForms Editor.
If it is "on", most hosting companies allow access to an .htaccess file, this file, generally at the root of your web server’s public_html directory (or if it doesn't exist already, would be created their), allows you to set text strings which control you PHP setup. In the case of magic_quotes, you would set:
magic_quotes_gpc = off
To disable the feature.
magic_quotes_gcp for GoDaddy Users
For GoDaddy users, you need to edit the default php.ini file in your server root and change its name to php5.ini. Next, add the following lines to the php5.ini file:
[FB]
output_buffering = 4096
magic_quotes_gpc = Off
Doing so will disable magic_quotes as well as enable output_buffering, which will speed many RackForms operations up!
Database Layer
RackForms makes extensive use of a database layer to handle form jobs, submissions, and user management. Two major Database vendors are supported: MySQL and Microsoft SQL Server. For MySQL you must be running MySQL 5 or higher, for SQL Server you'll need Server 2005 or higher.
MySQL PDO Extension
For MySQL users, RackForms requires the PHP_PDO extension, which on Windows is a bundled .dll from version 5.1.0 and up, and on Linux as a PECL extension from version 5.0.3 and up.
You will also need to enable the specific PDO driver in php.ini for your database. For example, with MySQL on Windows the extension is php_pdo_mysql.dll.
MySQL Database Privileges
By default, RackForms uses prepared statement queries for all MySQL database interaction. This means RackForms should be compatible with all versions of MySQL 4 and above (though 5 is the only officially supported database).
However, RackForms also supports MySQL Stored Procedures. If you choose to use Stored Procedures, it is vital for MySQL users to assign the proper privileges to the RackForms user. Specifically, you must GRANT the RackForms database user:
- CREATE ROUTINE
- ALTER ROUTINE
- EXECUTE
Further, if you are running MySQL in a replicated or binary logging environment, you may need to assign special privileges to the RackForms user, or set the log_bin_trust_function_creators system variable to 1.
Keep in mind though, these extra permissions are only necessary if you check the 'Use Stored Procedures' box. RackForms will run the exact same if you choose to use procedures or not!
max_allowed_packet
Default installations of MySQL
are limited to 1MB per-packet. In many instances this is fine, but because RackForms allows you to save any and all file uploads to the Database, you will run into problems if you try saving elements to the database that are at or near this limit. There is a simple solution however, and that is to raise the default limit to something larger. The maximum packet size is 1GB, so you have plenty of room to experiment.
Please keep in mind this limit is only an issue if you plan on using RackForms in a manner that allows for uploads larger than 1MB. The RackForms installation process will not run into this limit at any time, so you do not need to worry about this limit if you plan on simply installing the software and never allowing file uploads larger than 1MB.
MySQL Character Sets and Collation
RackForms uses the UTF-8 Character Set with utf8_general_ci collation for all database calls. Thus, you will need to make sure the database you create or use with the RackForms installation uses these settings or you will run into subtle problems with character encoding or outright installation errors.
Of the two issues that can arise by not having proper settings, the most serious, and ultimately one that can halt an installation or user login, is an improper collation setting. Although your Database management tool will have its own specific procedure for setting collation, at the most basic level you can issue a simple sql statement to set the character set and collation for the RackForms database to utf8/utf8_general_ci.
For example: ALTER DATABASE your_RackForms_database_name CHARACTER SET `utf8` COLLATE `utf8_general_ci`
If you have phpMyAdmin, you can select your database, click the Operations tab, then select the proper collation (utf8_general_ci) from the drop down list 'Collation:' near the bottom of the page.
Again, all database management tools will have varying procedures for setting character set and collation, but the process is very simple in almost all cases.
More on MySQL character set support and Character Sets and Collations in General.
MySQL/ MSSQL and Escape Characters via NO_BACKSLASH_ESCAPES
Because RackForms makes heavy use of custom code segments, you may find yourself in a situation where you want to create a PHP code segment like:
<?php
$var = 'This is a testing server\'s dream';
?>
That is, creating a string that escapes upon itself. The problem is most MySQL servers treat back slashes as escape characters, which means your code would have the escaping slash stripped, leading to a PHP error when the page is run. This happens because all job information is always saved to the RackForms database, and when this PHP code is INSERTED into the database, the slash will be striped if not first escaped. More on MySQL Escape Characters.
Starting with Build 611 RackForms has added an app/config.php option to allow for both modes, that is, your server is or is not running with NO_BACKSLASH_ESCAPES mode.
To find what mode your server is running in, launch a MySQL management tool such as phpMyAdmin and look for the sql_mode listing, which can be found in phpMyAdmin under the Variables tab. If your server is in NO_BACKSLASH_ESCAPES you will see something similar to:
NO_BACKSLASH_ESCAPES,STRICT_TRANS_TABLES [etc]
If you see this, you will want to open your app/config.php file and set the NO_BACKSLASH_ESCAPES line to read:
define('NO_BACKSLASH_ESCAPES', '1');
This will make sure that RackForms does not try to escape your code segments, which means they will run as expected on a live page.
Please note that MSSQL servers will run with NO_BACKSLASH_ESCAPES mode ON (1) by default.
Microsoft SQL Server
For Windows users of SQL Server you'll need to install the official Microsoft SQL Server 2005 Driver for PHP.
This is a simple process of extracting a .dll file into your php extensions directory and adding a line to your php .ini file (for example, extension=php_sqlsrv_ts.dll). Restart your web server and the extension is ready to go. Please note this driver is for Windows only. If you want to run Linux, you must use MySQL
as your database layer.
MSSQL connectivity also requires the SQL Server 2005* Native Client (x86 or 64bit) to be installed on the Machine PHP runs on. More on SQL Server 2005 Driver for PHP requirements here.
File Permissions - External Files and Web Server Access
You must have the ability to write files to your web server and to change permissions if necessary to allow your web server to write such files. You should also be careful of assigning too high a privilege level to your directories and files, as not only is it insecure, but some web hosting providers will automatically prevent your pages from loading as a security measure.
For example, if you assign 777 to your /output directory this location is now world-writeable, and any forms you create may not load properly as a security precaution. This error would manifest itself when you build and export a form as an 'Internal Server Error' page instead of your form page.
For best results, follow the permission guidelines below:
- UNIX Systems -
755 or 775 to the /ouput directory and all sub-directories of /output
644 to the config.php files located in /app/config.php and /app/movefiles/config.php
Note that using 755 or 775 on the /ouput directory will depend on how you have your web server setup. In most cases, your web server will run as its own user and group (generally apache), which means you could: chgrp -R apache /output, which would mean a chown -R 755 /output would allow the apache user to write to the /output directory, which is what we want.
Again, as stated above, it is generally not advisable to use: chown -R 777 /output.
- Windows Systems -
You should provide your web server user (IUSR on IIS 7, or IUSR_MachineName on IIS6) with read/write permissions to the /output directory and all sub-directories of /output, and write permissions to both config.php filesas detailed above.
Email Authentication Settings
In some cases your server
may not work with PHP's mail() function and by extension, the default mail delivery method of RackForms. This can happen if your server needs to use authenticated email relays, or your running a "consumer" Windows box with no SMTP server installed (e.g. Vista). There are three possible solutions for this:
Solution 1 - If you do have an MTA and thus have access to a mail agent, you can set your MTA to allow for emails that originate within the same domain to be sent without authentication. As part of this solution you need to edit your php.ini file to provide information on your SMTP host in the following manner:
[mail function]
; For Win32 only.
SMTP = smtp.your_host.com
smtp_port = 25
; For Win32 only.
sendmail_from = me@example.com
This solution will generally not apply to shared hosting environments, that is, a server you do not administer. On a final note, smtp_port may not be 25, but a different value such as 587.
Solution 2 - If you are running in a shared hosting environment or otherwise one that you cannot enable same domain authentication pass through, you can try using the Simple Email and Email+ module's Additional Command Line Parameters options box to pass the MTA switches that would enable mail(). This is not practical for most servers, so the last option will probably be the best...
Solution 3 - Use RackForms SMTP. Starting with build 623 RackForms now supports SMTP authentication for sending email. To send authenticated mail, you would enable SMTP email for a Simple Email or Email+ item and fill in the proper email authentication details. SMTP email allows you great latitude--for example, many free email services such as Google's Gmail support SMTP email, which means you could send mail via RackForms on a local Vista box, which is great for development and testing.
Flash File Uploads and Apache Server Security
RackForms uses an Adobe Flash based file upload system.
In some cases your Apache web server may be configured to block such uploads. If you run into a problem where images you attempt to upload are not being displayed on in your forms, follow this process to remedy the problem:
Using a file management tool, create a file on the root of your public_html or domain folder called:
.htaccess
You may already have one, if that is the case, simply open it for editing.
Add to the .htaccess file the following text:
SECFILTERENGINE OFF
SECFILTERSCANPOST OFF
Save and close the .htaccess file. You should now be able to upload images.
General Directory Permission Settings (UNIX Servers Only)
Starting with build
624 their is a new configuration option for setting folder and file permissions for every object created by RackForms. You will find these options in two places:
RackForms/app/config.php
RackForms/app/movefiles/config.php
In both files the actual code for these settings looks like:
// Build 624 - Set Write Permission Level - Not Needed On Windows
define('DIRECTORY_MOD', 0755); // Octal based UNIX permission level e.g. 0755, 0777
// Build 624 - Set File Write Permission Level - Not Needed On Windows
define('FILE_MOD', 0644); // Octal based UNIX permission level e.g. 0644, 0664
Thus, by default RackForms will use 0755 for folders and 0644 for files. This should work for just about every server in existence. However, if you need to adjust these permissions, you certainly can.
Requirements Summary
To summarize the last three sections, you'll need PHP 5.1.4 or higher, MySQL 5.0 or Microsoft SQL Server 2005 or greater, and the ability for your web server to write files to specific locations in your RackForms installation directory.
The RackForms Installer Screen
Mouse over and click a letter to jump to the explanation for that item
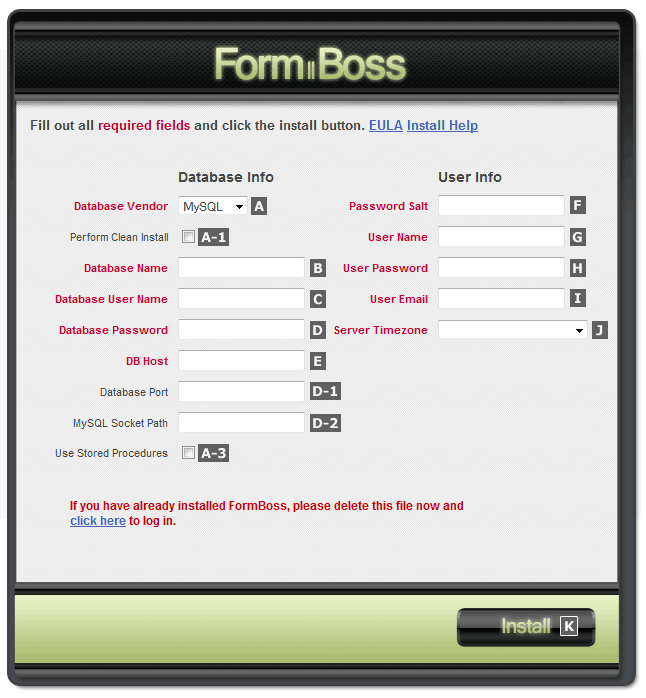
By default the RackForms application comes with an installer script: install.php, located at the root of the RackForms directory. This file will load automatically if you try to run RackForms with this file present.
The installer requires two sets of information to complete its task, Database and User information.
The section below is simply an explanation of each field for those two categories of information. If you're an experienced web developer, many of these fields will be familiar. If they are, feel free to fill them out and hit install. In most cases everything will simply work and the install process will be complete. If you run into problems, or simply want to know as much as you can, the section below should be able to answer many of your most common questions.
Database Information (Please see the image above and below for locations of the lettered elements):
- A Database Vendor - Choose between MySQL and MSSQL.
Back to Install Screen Image
- A-1 Perform Clean Install - By checking this box you will perform a clean install, which means all RackForms tables will be deleted and then recreated. This option only has an effect if you have an existing installation where tables have already been created. Be aware that removing all RackForms tables will effectively delete any RackForms data such as saved jobs, entries, and user accounts.
Back to Install Screen Image
- A-3 Use Stored Procedures - The usage of this box depends on what Database Vendor you have selected:
MySQL - If you know your MySQL web hosting provider supports stored procedures (GoDaddy for example), you can safely check this box. RackForms will then use stored procedures for most database connectivity. However, not all hosting providers enable or even allow the use of stored procedures (HostGator for example), so you may simply want to leave this unchecked. Stored Procedures are by no means required, and the application will act no different without procedures.
MSSQL - If you're using Microsoft SQL Server, you must check this box. You will notice the box is checked automatically if you select MSSQL from the Database Vendor box.
Back to Install Screen Image
- B Database Name - The database schema you want RackForms installed too. Please note the installer will not over-write existing database tables that are not RackForms related. All RackForms tables are prefixed with fb_.
Please note: This Database must already exists for the install process to be successful!
cPanel Shared Hosting Users Please Note: cPanel has a habit of appending your UNIX user name to the value used as the database name. For example, if you type in formbos as the database name and your home directory value is: /home/test, cPanel will actually create a database called: test_formbos.
The reason why I tag this as strange is because when creating the database name cPanel never actually tells you this is happening, it just does it. The good news is that after you crate the database you will start to see it show up in the new format, but for first time users you may miss this!
Back to Install Screen Image
- C Database User Name - In MySQL this is fairly strait forward, just find your database user name. In MSSQL you'll need to make sure you're server is running in 'SQL Server and Windows Authentication Mode', which is accessible in 'Server Properties' (right click on the database instance in the Object Explorer in SQL Server Studio). RackForms does not use Windows Authentication for SQL Server connections, hence the need for SQL Server Authentication. Please note this setting is not set by default with a fresh SQL Server installation, be it in the Enterprise or Express editions.
cPanel Shared Hosting Users Please Note: cPanel has a habit of appending your UNIX account name to the value used as the user name. For example, if you type in formbos as the user name and your home directory value is: /home/test, cPanel will actually create a user called: test_formbos.
The reason why I tag this as strange is because when creating the user name cPanel never actually tells you this is happening, it just does it. The good news is that after you crate the user you will start to see it show up in the new format, but for first time users you may miss this!
Back to Install Screen Image
- D Database Password - The password for your RackForms database user.
Back to Install Screen Image
- E DB Host - Please pay close attention to this one, the value used will depend on the database type:
MySQL - In 90% of the installs you do this will be localhost. However, as RackForms uses a slightly different database driver than most PHP software, you will probably have to set the MySQL Socket Path setting as well. Some suggested values are given directly below.
GoDaddy Shared Hosting - The host name will generally be a long string such as: host.db.4757614.hostedresource.com
HostMonster/HostGator - Your host name should be: localhost, MySQL Socket Path: /var/run/mysqld/mysqld.sock
BlueHost - Hostname: localhost, socket value will probably be: /tmp/mysql.sock
MSSQL - SQL Server Express will generally be MACHINENAME\SQLEXPRESS. On production systems or web farms that use SQL Server Professional, you generally use the ip address of the database server or its domain name.
Back to Install Screen Image
- D-1 Database Port - (MySQL ONLY, NOT REQUIRED) - Most MySQL installations use port 3306, which means you can generally leave this field blank as that is considered a default port and used automatically. However, some stacks such a MAMP will use port 8889 by default, in other circumstances your server administrator may have used a different port for security reasons. If you are using a port number other than 3306, place it in this field.
Back to Install Screen Image
- D-2 MySQL Socket Path - (MySQL ONLY, NOT REQUIRED BUT GENERALLY NEEDED) - In many instances your web hosting provider my have configured MySQL in a way that changes where the default MySQL socket file is, and this change may cause the PDO extension which RackForms relies on to fail.
Thus, if you receive connection errors despite being absolutely sure the database user name, password, database name, and host is correct, you should try using:
/var/run/mysqld/mysqld.sock
/tmp/mysql.sock
/var/run/mysqld/mysqld.sock
If neither of these values work, please create a page called info.php and place this text into it: <?php phpinfo(); ?>
Run the page and perform a text search for SOCKET
If you have the mysqli extension installed, you will find a line called MYSQLI_SOCKET, the value of that line will be the value you need to input into this field. If you do not have the mysqli extension installed, you will need to contact your web hosting provider for further assistance.
Host Specific Settings for the SOCKET Value
MAMP - Here is an example of a MAMP install that had configured the MySQL socket incorrectly, and the fix.
One of RackForms's users has created this useful checklist for MAMP stacks, you may find it useful:
For Mac users using MAMP:
1. Drag the RackForms_pro folder into the htdocumentation folder inside the MAMP installation
2. From the MAMP window, click Preferences... > Ports > Set to default Apache and MySQL ports > OK
3. Create database for RackForms, making sure Collation is set to utf8_general_ci as it defaults to sweden. Default user has privileges set to all so that shouldn't be an issue.
3. On the Form Boss Installation page:
Database Name: whatever you just created
Database User name: root
Database Password: root
DB Host: localhost
Database Port: leave blank if you did step 2 above
MySQL Socket Path: /Applications/MAMP/tmp/mysql/mysql.sock
BlueHost - Your socket value will probably be: /tmp/mysql.sockHostGator/GoDaddy/HostMonster - Your socket value is generally: /var/run/mysqld/mysqld.sock
Back to Install Screen Image
- General Notes on Database Information - Both MySQL and MSSQL need to have the database schema and user defined before installation. In other words, you will not be creating schema and users with the RackForms installer, just using the login credentials from items B , C and D to create new tables and add optional stored procedures to an existing schema.
This means that while you can create and use an exclusive 'RackForms' schema, you do not need too. You can safely install RackForms into an existing schema without fear of deleting existing objects so long as your existing objects do not begin with fb_. To that end, all RackForms database tables and optional stored procedures are prefixed with fb_
Back to Install Screen Image
User Information
- F Password Salt - RackForms uses password + salt encryption, this field simply needs to be a string of random characters that are used as the randomizing salt. It is recommenced that you use at least 20 characters for this field.
Back to Install Screen Image
- G User Name - This is the login name you will provide to RackForms to log in to the manager.
Back to Install Screen Image
- H User Password - The plain text password used to log in to RackForms.
Back to Install Screen Image
- I User Email - Your primary account email address. Used for lost passwords.
Back to Install Screen Image
- J Server Time Zone - Select your time zone from the list. Many PHP installations do not have a time zone set in the .ini file, this setting will ensure your form submission times match your preferred server time zone.
Back to Install Screen Image
- General Notes On RackForms User Information - Password salt, as mentioned above, should be at least 20 characters but can be any number you like. The more characters the better, however.
You will be able to update your User Password and email at any time after installation.
Your PHP .ini file may already have a date.timezone = configuration property set. Setting one here will override that setting when running RackForms scripts only.
Back to Install Screen Image
When all fields are filled out to your satisfaction click the Install button. K
An important note on how the installer treats existing tables and data:
If you install RackForms into an existing schema, no data is lost or overwritten except for any matching admin account that has the same name as an existing one. For example, if you first install RackForms with the admin 'User Account' name of 'admin', then re-run the installer with 'admin' as the 'User Account' name, the existing admin account is removed and the new one is used instead.
If the process completes without any errors you will receive a success message. You are then instructed to remove or rename the install file. Perform this action and you're finished with the installer. You may proceed to Final Steps.
Resolving Errors
If you receive an error message, follow the on-screen instructions to resolve the issue. The most common errors will be:
ERROR: Could not write config file.
This will happen if you have not set the proper permissions on app/config.php and app/movefiles/config.php
To remedy this, make sure those files are writeable by the account the web server is running as. In Unix/Apache environments, setting -644 or -664 on both config files and -755 on /output and all directories inside /output will suffice (more on file permissions).
In Windows/IIS environments, you'll want to make sure the IUSR or IUSR_MACHINENAME accounts have read/write permissions on the /output directory and config.php files. In many cases, you will need to add the IUSR or IUSR_MACHINENAME accounts via the security tab the file or folders properties. Alternatively, you can install your PHP binaries into the /inetpub folder to inherit IIS permissions.
If you use Windows with Apache, you'll want to set your permissions using the account Apache runs as.
ERROR: Database not created properly, or an account already exists.
This error will trigger if their was a problem with the SQL installation script portion of the installer. You may want to clear out any database objects from a previous installation, or try installing to a new schema name.
ERROR: Database driver not installed.
You will see this error if the appropriate PDO database driver is not installed, or if PDO extension itself is not installed. On Windows you'll need to edit you PHP .ini file to include the PDO Extension as in: extension=php_pdo.dll, and also to include the proper driver as in: extension=php_pdo_mysql.dll
ERROR: Could not connect to the Database. Check your Username, Password, and Host settings.
You will see this message if your connection information is not correct. As the message states, this would be due to schema/username/password problems, or the host name not being correct.
MySQL Specific
If running MySQL, your local host name will be localhost, or if being served through a hosting company, possibly an ip or domain name such as 'sql101.secureserver21.net'.
You may also want to check out any problems with the MySQL socket, explained here.
SQL Server Specific
If running Microsoft SQL Server remember that you may need to specify host name + instance. For example, COMPUTERNAME\SQLEXPRESS--though not always. Sometimes your DBA will set up the server to just have a server name.
One final point on SQL Server, RackForms uses SQL Server Authentication Mode, not Windows Authentication. This means in your server properties you will need to select SQL Server and Windows Authentication mode from the 'Server authentication' radio boxes.
ERROR: I could not create the MySQL stored procedures! (MySQL only when attempting to use Stored Procedures)
This error will be triggered if your MySQL database did not allow the RackForms installer to create necessary stored procedures. This could be because your web hosting provider, despite supporting MySQL 5, has unnecessarily removed the proper privileges your database user needs to create and use stored procedures: CREATE ROUTINE ALTER ROUTINE and EXECUTE (this may be the case if you are on a 'shared hosting' plan).
If this error can not be resolved (you can't GRANT the proper permissions), you can simply uncheck the Use Stored Procedures Box. RackForms will run the same as if you installed the procedures.
Fatal error: Cannot clone object of class PDO due to 'zend.ze1_compatibility_mode'
This means you have a legacy php.ini directive set which is not needed, and can safely be disabled.
Please see here for a description of the directive. The fix this error, you simple need to set the zend.ze1_compatibility_mode directive to be 0.
Resolving Login Errors
Their have been a few instances of users being able to install the software without error, but then not be able to login.
The most common cause of this is your hosting provider not configuring MySQL correctly. In order for RackForms to run correctly, your database user needs CREATE ROUTINE, ALTER ROUTINE and EXECUTE permissions.
The easiest way to check for execution privileges is to open the app/config.php file in you RackForms directory. Look for:
define('DEBUG', '0'); and change it to: define('DEBUG', '1');
This will enable debug mode, which will display any errors encountered after a login attempt. If you receive an error, copy it from your web browser display and send it to support to support [-at-] rackforms.com
Final Steps
You've run the installer and all is well. To finish up, you'll need to ensure RackForms has a few extra tools to perform its job.
Please follow the steps below to complete the RackForms install process.
Custom CAPTCHA
GD Library + FreeType
If you plan to use the CAPTCHA security option with your forms, you must have the GD and FreeType libraries installed and enabled. On Windows make sure your PHP .ini has the extension enabled: extension=php_gd2.dll, or on *nix platforms, that PHP has been compiled with GD and FreeType support. More Info on GD.
Font Files
Along with the GD library, RackForms requires you have the monotype.ttf font available for use during form export if you choose to use the Custom CAPTCHA feature.
On Unix machines this is a non-issue. RackForms comes with the necessary font and exports it with every form.
On Windows machines, there is a know bug that prevents Windows from releasing the font file after use. The end result is the job folder cannot be removed properly using the RackForms job editor.
The solution is to grab the monotype.ttf font file from:
\RackForms\app\movefiles\security\Captcha
And install the font file as you would any other font. RackForms will then use the default /Windows/fonts font directory whenever the font is needed instead of the one located in the job folder.
If you do not have access to the fonts folder, or your hosting provider will not allow you to install or refuses to install the monofont.ttf font file for you, you may need to look up your server version and cross reference that with a list of know Windows fonts. Find a suitable True Type Font (.ttf) file, and open up:
\RackForms\app\movefiles\security\Captcha\CaptchaSecurityImages.php
Replace the text monofont.ttf with the name of the new font file. Create a test job and export. You may need to experiment to find a good combination. A good choice would be: Lucida Sans Unicode and Lucida Console on older servers, and Cambria
reCAPTCHA
As of build 557 RackForms supports the reCAPTCHA system. In order to use this CAPTCHA method you will need to have an account at recaptcha.net. Creating an account is very simple, but you want to be mindful of what type of account you create.
If you plan on creating forms and using reCAPTCHA for more than one domain, you'll want to check the Enable this key on all domains (global key) checkbox. Selecting this feature means you can create a shortcut in RackForms, in that no matter what site you create a CAPTCHA block for, you can edit the /app/movefiles/security/secure_submit.php file to include the two keys you receive from the reCAPTCHA sign up process, and those key's will work for all domains.
This is a short cut because if you do not provide the /app/movefiles/security/secure_submit.php file with your reCAPTCHA key's, you will need to input them for every form you create that uses reCAPTCHA. For many uses this will be a huge time draw.
Finally, it should be noted that while you do not need a global key to take advantage of the /app/movefiles/security/secure_submit.php hard code trick, it may come back to bite you if you hard code single domain account key's and then try to use that key set on an invalid domain. It's always best to plan ahead!
3D Captcha
Similar to the Custom Captcha Method, this Captcha type needs a custom font installed to work. You will find the font file at:
\RackForms\app\movefiles\security\3DCaptcha\src
You will need to install the font on Windows systems, on Unix like systems you do not need to do anything else.
Ready to go!
And that's it. RackForms is now fully installed and ready to go. Should you encounter any problems not covered in this document, please visit us on the forums, or drop us a line.