RackForms
v7.8.9
image

Latest Release: Build 959 - November 6th, 2025

Home > Form Elements > Image

In Brief: Add an image element to your form. Images can be of any acceptable web type.
Dependencies: none.
Hints & Tricks: To upload an image, click on the 'Upload Image' button. A Flash based * file selector will pop-up, select an image from your drive and click ok.
There is no set image size limit, but be mindful of users who may not have a fast internet connection.
If you set this image as as submit button, you must REMOVE any real submit button elements on your form, or your form will break due to limitations in Javascript.
APACHE UPLOAD ERRORS (uploaded images do not show up)
* There is a known compatibility issue with some Apache Web Servers and mod_security. A simple workaround is available, which you can find here.Options/Properties
Link Properties
A Note on Link Precedence **
If you're only using images as just that, static images, you don't need to worry about this section. If you do want to use the link options, read on!
Because we have several ways to handle images when being used as links, it's important to note that some settings have precedence over others. That is, if we fill out one field this new setting will override a 'lower' one.
At the top of the food chain is Act as Default Submit. If we have this box checked, no matter what we have in any of the other boxes, our image will act as the default submit button for the form page.
Next down the line is Submit Route. A value in this box means when we run the form a click on the image will be treated as a submit route action. This means we override Link Address, but not Act as Default Submit.
Link Address--Finally, if Act as Default Submit is not checked and Submit Route has no value set, the image will act as a link to the address specified.
** In RackForms Builds 678 and higher the UI has been rearranged to reflect this order of precedence.
Finally, also as of Build 678, we have expanded the image module so that images used on Confirmation or Builder pages now support image links and tokens.
Act as Default Submit
Check this box to have this image act as the submit button for the form. Be aware that you can only have one submit button per form page, so remove any 'Submit' button items already in the form, if present.
Submit Route
By entering a value in this box you're tell RackForms that when the button is clicked, go to that page after processing the current pages form elements. This is very similar to a regular Submit buttons Route property, only the element being acted on is an image, not a traditional submit button.This property takes precedence over the Link Address property.
Link Address
If left blank your images are simply that, static images. However, if you place text into this box RackForms will render the final form with this element as a clickable link. RackForms automatically removes any border from image links with the border="0" html property.As of Build 678, this field now supports RackForms 2 tokens:
F{field} = FIELD Elements (e.g. Form Items)
S{session} = SESSION
P{post} = POST
G{get} = GET
${php} = PHP
Link Title
Fills the html image property 'title=' with the text you specify. Only used if you have supplied a Link Address for this image.
Link Target
Defaults to _self--but we can specify if we want our image links to open in new windows (_blank). Please note this setting only applies to links being set via Link Address. It has no effect for Submit Route or Act as Default Submit because those types of links are routed through internal mechanisms not governed by normal page redirection.IMPORTANT NOTE: if you use the Submit Route feature, you NEED to supply a value to the label and the Name/Value ID fields. If you do not supply a value, the internal RackForms check for proper form submission will fail.
Database Image Properties
RackForms can pull images from your database and display them in place of static images. Please note all images must be pulled from your default Rackorms installation database.
At the most basic level, this feature has two modes of operation:
A. Automated - This mode means RackForms will use default values for most fields to pull single or multiple images from the database. The key point is the default values assume we're using the fb_images database table, which is installed by default with RackForms. We can save images to this table using the SQL+ module.
B. Fully Manual - This mode means we'll provide the image display process with the key variables needed to pull your image data. You'll provide a database table name, column name, and the names of the columns your image and image id reside in. This method is used when our images are not saves to fb_images, but a custom table.
Like a head start? Watch our demo video, as we cover the basics of this module.
The following options control image display process:
Enable Database Image
This option allows us to toggle on the use of database images. If checked, RackForms will attempt to query your database using the options below.
Database Table
This is the name of the database (or schema for PostgreSQL users) table the image resides in. We enter this value as a simple text strong, and must match exactly with your table name.
If no value is provided, RackForms will use the default: fb_images.
Database Column Name For Image Data
Similar to the Database Table option, this is the column name your raw image data resides in. Just as with Database Table, this field also has a default option, image_data.
Image ID Column Name
If your images are stored in fb_images, we can ignore this field. If not, here is where our process of using the Fully Manual mode gets a bit involved. If we want to query a database to get image data, we need a few pieces of information:
A. The table name
B. The column name
C. The id of the image to get
D. The name of that id column.
This field is a very important piece of that process, the D item.
That is, The items above supply A and B, we supply C in the next option. But this option, this is the one that says which column our image identifier is called. This is simply because we cannot query off of image data. We cannot say, get me the image of the red balloon, we instead need to say which id value (almost always a number), this image's row in the database has. In most cases this value should be the unique, primary key of that table.
Image ID
This value is directly related to Image ID Column Name, and is optional if using Entry ID Column Name and an Entry ID.
If not using Entry ID, this is the (almost always) numeric value of the row's primary key of the image we wish to display.
Consider the following table:
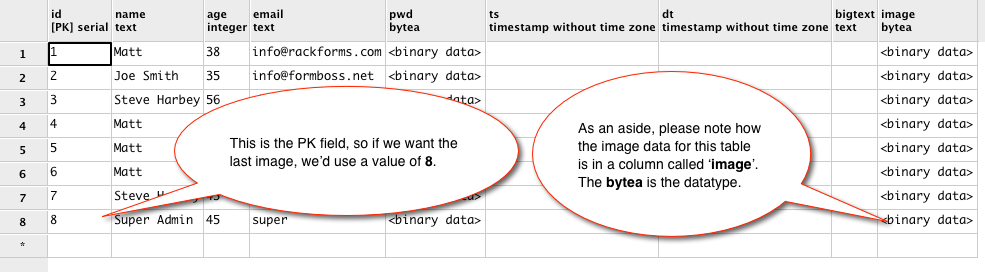
This table has a primary key field called id, as we can see the last row has a value of 8. Thus, we'd use 8 in this field to grab the image from that row.
Entry ID Column Name
This option and the next are related, in that when used, causes RackForms to perform a lookup on your database against a specific identifying column's value, and if found, loops over each matching row and pull all matching images.
Consider the following table:

In this example, we can see the age columns' value of 45 is used in two rows. This is just one example, your table may have other related factors, such as order id. In any event, the key here is because that value is used in more than one row, we can tell RackForms that we want to query all matching values from that column, and if the value is found, pull all images from the matching rows.
This field then, is the name of that column we wish to query against. In the table above, the value we'd enter into this box would be age.
Entry ID
Directly related to Entry ID Column Name, this is the value we'll query the table for matching items.
Referring to to example above, we'd use a value of 45 to return the two rows with the id fields of 7 and 8. RackForms will then perform a loop and pull each of those row's image fields based on the values we previously entered for Image ID Column Name and Image ID.
Put another way, the Entry ID options rely on the Image ID Column Name and Image ID values to work.
Image Size
We can select from two sizes, though this option is usually only used for fb_image table users in the Automated work-flow. If, however, your table has thumbnail images saved, we can also use this option in the Fully Manual mode.
Max Image Width
If defined the maximum width your image will display at. It's important to note this does not resize images at the software level, it only resizes the image in the browser. Thus, if you have very large images, it's far better, and indeed safer, to use image thumbnails.