RackForms
v7.8.9
ajax

Latest Release: Build 959 - November 6th, 2025

Home > Form Elements > AJAX

In Brief: An element that lets you query a database and return the results to form fields such as select boxes.
Dependencies: A standard form page.
Hints & Tricks: This element is best used in situations where we have changing data based on user input and we want to keep the user on the current page.
It's also important to note that this field needs two distinct 'bindings' to work. First, we need to designate what field will fire the AJAX event (AJAX Update Binding Options), the second binding to tell the AJAX module which field(s) to update with the retrieved data (Item Options/AJAX Bindings).
PHP Version Note: This feature, because it makes extensive use of native JSON features, is only supported in PHP 5.2 or later.
AJAX Introduction Tour - Start Here!
Please be sure to watch in HD and full screen for the best experience!
AJAX Module Doesn't Seem To Work?
One of the most common issues with creating AJAX logic is using a faulty SQL Query. This doesn't necessarily mean the query is bad in terms of failing with errors, but rather, that the query may be trying to 'connect the wrong dots'. This is a common problem because by its very nature the AJAX module relies on a relationship created between the SQL query and the binding values we pass it. If our query is trying to say, look up a specific user name by id but we've bound a users age to the SQL variable, the query will run but we'll get no results.Thus, a good rule of thumb is to carefully consider what data the AJAX query should process.
Using Empty Binds
Sometimes we may want to run an AJAX query, but do not want the result to bind to any field, rather, we simply want to run the query and create custom code in the Code To Run After Query box. For example, we want to create show hide logic based on the values of fields.To accommodate this, in Builds earlier than 747 we can simply bind to a dummy item such as a hidden field. However, starting with Build 747 we can now create AJAX items to do not contain bindings, and will not throw errors because of this.
CAUTION! By default RackForms attempts to use the MySQLi extension in the RackForms editor UI when setting AJAX binds. As most servers have the MySQLi extension enabled by default this isn't an issue. However, if your server has the rare setup of having PDO but not MySQLi an error will be triggered. To fix this we must set the AJAX items: Data Source > DB Vendor to a valid setting.
Options/Properties
Basic Attributes
Design Notes
These are notes you can input that help you and other production staff understand your confirmation elements logic and purpose. This text is never used in the live form in any way, it is only for internal development.AJAX Options
SQL Debug/Data Return Mode
This field will allow you to view the HTTP Response object for any error messages. Pleas note however, that you will need to have FireBug or some other HTTP Request viewer for these messages to be visible.
SQL Code
Sets the currency type of the transaction. If you need a currency type added, please use the contact page to request one!
Code To Run Before Query
This code, which must be raw JavaScript, runs just before the HTTP Request. This can be useful for checking the state of a page and showing/hiding fields based on this information.
Code To Run After Query
This feature allows us to run custom JavaScript code upon a successful AJAX query. It is important to note that this code must be raw JavaScript, in that we do not include <script> tags.It is also important to note that this code only runs after a successful query, that is, one that returns results. Technically, Prototype JS uses a custom event handler: onComplete: to handle a successful query, and the code we add with this control is placed at the very end of that event handler.
One very handy use for this feature is to create code to update specific parts of our form that aren't nessesarily input fields.
For example, a common need is to update an HTML <span> or other text element with a value. We do not, in other words, need to update an input field, but rather just show some related value to the user.
In order to grab such display values out it's important to note that:
All AJAX queries return results to a variable called: res
res is an array, with each index containing an object that holds an index (always 0) to your fields value, as well as the database Column name that can be accessed via standard dot notation.
The number of indexes the array has is determined by the number of results our AJAX query returns.
This is best explained in a sample job, of which you can find under AJAX > customize-ajax-results.xml
The short version though is that so long as we know that a variable called res contains our data, we can refer to the rows data with one of the following (or both) syntaxes:
res[0][0]
res[0].your_fields_database_column_name
One final hint is that using FireBug we can enable the console and watch our JSON results populate the log. This is a great way to see a nice structured listing of all results, though we can create our own code to view raw results as well.
For example we could add the following code to the Code To Run After Query box:
var d = new Element('div', { 'class': 'ajax-debug', 'id': 'ajax-debug' }).update("AJAX Debug");

if(res) { // always check to see if res is set, if not we had an exception or an empty result.

    res.each(function(i){
        label = i[0];

        var br = new Element('br', { }); d.appendChild(br);
        var e = new Element('span', { 'class': 'ajax-debug-item', 'id': ''  }).update(label);

        d.insert(e);
    });

}

$(document.body).appendChild(d);
Please note how we check for the existence of res before using it! This is an very important step, as we can never assume that res will exist. Network errors like timeouts, faulty data and so on, can all place this variable's existence in jeopardy, checking is a simple step that will ensure our users do not experience unnecessary errors.
How RackForms AJAX Calls Return Data
Knowing how RackForms returns AJAX data is essential for creating custom logic. The basic idea is as already noted RackForms returns the result of a call to a JavaScript variable called res. res, in turn, is created by eval()'ing the JSON response of an AJAX call.We can view this JSON data (and hence, the res variable data) in the Firefox Firebug console (or any other browser that shows the result of HTTP Request calls) like so (note how we've clicked the JSON tab to get a nicely formatted view of our data):
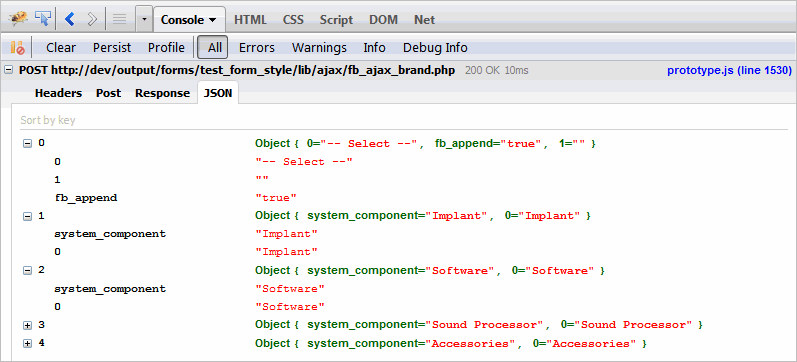
So in this case res contains 5 'rows' of data, each row contains several items. The top or first item is the main select display element, and is created by default so that our select element retains the same appearance as before the AJAX call. For most purposes we can ignore this element.
The next rows contain the actual AJAX database call result. Note that each 'row' contains an indexed and named item. This means if we do not know the name of a field we can use the index. In most cases we will know the name of the field, as these names simply come from the database columns our SQL Code defined via the SELECT statement.
In conclusion then when developing custom AJAX logic it may be helpful to visualize the actual data being returned. Using a web browsers HTTP Request facilities we can easily do so.
AJAX Result Processing Library
This option allows us to set which JavaScript library processes our Ajax call. The default is jQuery, through we can also use Prototype.JS. The behavior between the two libraries is identical, only with jQuery we're ensured better compatibility with future builds of RackForms.
The main reason we'd want to change this value is if we're using custom JavaScript code in our forms and we want to ensure the same library is used for your code and that code RackForms generates for the AJAX module.
AJAX Result Processing Mode
This powerful feature lets us process standard RackForms tokens in the AJAX result text. The following tokens are supported:
S{sesion_element_name}
F{form_field_name}
Thus, we could include this code in the text our AJAX call returns:
Thank you for using the AJAX Module S{name}!
...and so long as we have a session element already set with a value, the AJAX module will substitute the value of the token and return the modified string.
To see this logic in action please load the sample job: ajax-result-processing-mode. In this job we step through the process of creating an AJAX item that processes a dynamic token call using a PHP SESSION element.
AJAX Result Error Mode
This option displays any error messages in dialog boxes resulting from faulty AJAX calls.Technically, we trap any error using Prototypes onException() callback, which means we can trap network issues, but more commonly, any problems with bad AJAX result sets. This means if we return an empty result set when we should always have one we would display an error to this affect.
By default this option is set to not display errors.
Append Label
Along with this item, the next two 'Append' items were designed to give you greater control over the results returned and how you can use them. The basic idea is that when you query the database it could be useful to append a value to the front or back of the result set.The main use of this item for AJAX queries is to add a 'default' value to the select item you're posting to.
These fields then are broken into two main parts: the label and value.
The label, this field, is what would be set as the label of the form field. Technically speaking, this is the first index of the array (the [0] position)
Append Value
Similar to Append Label, this is the value or as far as the raw array is concerned, the [1] position.
Append Position
The last option for appending values is the append position. We have three choices; do not append, append to the front of the array, and append to the back.
AJAX Update Binding Options
Here is we actually set the AJAX properties. One of the most powerful features of this implementation is that we can create as many bindings as needed.
Watch This Field...
This is the form field we'll watch for update events as set in the next item. It is important to note that the event we chose should make sense for the item type.Please note that as of Build 691 we can watch an auto-suggest field. However, their are important limitations and items you should know about before you do!
Using This Event:
The JavaScript event that will trigger the AJAX POST call.Please note that as of Build 691 we can use auto-suggest fields to drive AJAX queries. However, due to a specific requirement of the auto-suggest logic, we must set this value to onblur to work. Please see this link for more.
AJAX Additional Bind 2-5
These fields, new to Build 715, allow us to add additional database field bindings to an AJAX call. This is handy in cases where having a single binding is not enough to describe the data that must be pulled from the database.For example, if we need to chain ajax calls together, we might need the result of a previous AJAX call to properly grab a new result.
Another scenario would be using other forms fields entirely, that is, ones not directly involved with the AJAX logic. For example, you could have a hidden field that stores a user id number, this id number would help drive better AJAX results.
To use these fields, we must supply the Name/Value of the field we wish to grab a value from.
These fields are intelligent in that if we do not supply a value to one of the fields the AJAX query will still work, though without the added filtering provided by the fields value.
Most importantly, these fields are only meaningful if we supply a more complex SQL query in term of our WHERE clause. Thus, a WHERE clause with only 1 element will not use any additional binds, whereas one with two would. For example:
SELECT name, id FROM fb_demo WHERE age = ? OR age = ?
We can see this new feature in action in Load Example Job > AJAX > ajax-additional-args
AJAX Query Result Population Mode:
This option lets us define what happens when a query returns results and populates its bound fields. By default we clear all existing field values, be it text from a text field or all existing radio or checkbox items.In most cases this is the preferred behavior, but their may be times when clearing old values is not desired. If this is the case, we want to set this field to Retain Existing Fields/Values.
Why the two settings?
Imagine we have a text field that's being populated by an AJAX query. When we populate this text field with a new value from an AJAX call we obviously do not want to save or append to the old value. However, what if our AJAX query returns no results? If we automatically clear the old value our users may be left confused as to why a form field element has decided to clear itself of a value. This is especially true if we're creating auto-suggest type logic.
A sample job detailing this scenario and why the AJAX Query Result Population Mode setting is important can be found in the editor under: Load Example Job > AJAX > ajax-clear-null-results
Another common scenario is for checkbox and radio items. By default an AJAX result will clear all old checkbox and radio items. However, what happens if we do not want to clear old values, but just keep appending them? If this is the case, then setting this field field to Retain Existing Fields/Values would be desired.
Of course this would be rare, as again, this type of behavior would be confusing to most users. However, this brings up an important point: what happens if we have preexisting values in a checkbox or radio item array that did not come from our AJAX query?
In most cases we've added these values for a reason, and we would not want an AJAX query to clear them out. If this is the case, then we want to use Retain Existing Fields/Values, as this way, while we'll retain old values from previous queries, we will not remove preexisting values.
That said, it's important to note that RackForms will not re-populate existing items when in Retain Existing Fields/Values mode. That is, if we have an existing checkbox value of 'Matt', and the AJAX query has a result item with the same value, 'Matt' will not be added twice.
That, in essence, is what this option controls. Do we clear the value when we have no valid values or do we leave it be.
Ignore First Parameter
This feature allows us to ignore the first parameter of an AJAX operation. The implications of this are quite important and open up huge possibilities for form creators.
Traditionally, when we fire off an ajax request we automatically bind the item that triggers the request as the first parameter of the database call. So for example, if we have a select item with names, the value of the selected name in that select item is the first parameter of the ajax call. This makes writing and using Ajax queries simple, but basically prevents us from using buttons as the Ajax event trigger.
This new option says that instead of doing that, we ignore that first or "trigger" parameter and instead only use the values passed via the Ajax Additional Binds boxes. As noted above the best example of this is using a Button element to fire off an Ajax query.
For example, imagine a form where we provide two select items, one for Album Name and the other for Artist Name. The user provides to each, and then, to populate a third text field, clicks a button element. Without this feature we'd pass the value of the button element to the Ajax call, which is almost certainly of no use to the Ajax logic. Now, however, we can skip that element and just use the fields we want!
Item Options
These are the AJAX bindings well use when an AJAX request occurs.
Bind This Field...
This is field that will receive the AJAX response. Once we have this item set, we need to set which values we want for the Label and Value are.You'll notice when we click this item a list of elements appears broken into two main categories:
Form Fields - All form elements on a page that receive their ID value from the fields Name/Value property. This is the 'classic' behavior of this field, and is used when we want to monitor a form field for changes.
Display Elements - New to Build 700, these id's are automatically harvested by RackForms from the first instance of a label field that possess an id="" attribute. That is, for any form element that has the label property (which includes all forms fields and text elements) if we add HTML code such as a div and assign an id to that div as in:
<div id="sample">Some Text</div>
RackForms will add this id to the list of fields the AJAX module can update with AJAX content! Thus, we could have a select item trigger a content update on a random div in our form, and so on.
Please note that at this time the only binding used to update our element is the Label As... property, described below.
Important Note: As noted above, RackForms will only find the first instance of an id="" declaration. This means if we have several nested divs with multiple id="" declarations RackForms will not add that element to the list of items we can dynamically update. The rule of thumb is to keep our nested structures simple.
Label/Element As...
This is the value that will show as the label of our Select items, and the primary value of any text based item such as text boxes and text areas.Please note that if we're binding a non-form field element such as a DIV, this is the value that is always used to populate the value, not the Value To... option.
Value To...
Required for selection based items, this will become the HTML value of the field. By default this field is set to be blank, so take care to set a value (binding) for this item!As noted below, when using select based items such as select and check box items, we can 'chain' AJAX calls together by putting, for example, an ID field that relates to another queries label field.
And (Optionally) Clear This Field...
This option allows us to clear a field upon execution of Ajax logic. This is most useful in cases where we have multiple Ajax calls. For example, imagine a form where we had:
Suppliers > Supplier Detail > Associated Detail.
Each field drives the next in the line which leads to an issue: If Supplier Detail populates the Associated Detail field, any change to our first field invalidates the Associated Detail result. Thus, this feature allow us clear any values we've populated to the children field until the user follows the proper population chain again.
Important Notes And Limitations
As of Build 675 RackForms handles the following form items: [text, textarea, radio, select, checkbox]Most items, particularly Select items, work as you would expect. However, their are caveats for the other field types.
First, text items, as you would expect, can only receive 1 value, the Label, which is unlike Select items which can have a separate Label and Value. Also, Text items can only receive 1 value in total. Thus, if you have a SQL statement that will return more than 1 row, you should use a select item to store the extra values. By design, should a bound text box item receive multiple items, only the last item is shown.
Get Creative!
The AJAX Field is quite flexible, allowing us to do some pretty neat stuff.
For example, we can 'chain' AJAX enabled fields together to create smart forms. Doing so allows us to create some really dynamic form logic. For example, we could have two select boxes and a text box. The first select item updates the second select item, and then the second select item updates the text box!
To see this type of logic in action, please check out the sample job:
\RackForms\goodies\Sample Jobs\AJAX\ajax-chain-calls.xml