RackForms
v7.8.9
Microsoft - OneDrive

Latest Release: Build 959 - November 6th, 2025

Home > Confirmation Elements > Microsoft - OneDrive

In Brief:
Use this module to upload a form submission's textual elements as a .json file to an Eneterprise (Azure) Microsoft OneDrive location. We can instead or also upload file elements from the form, such as file uploads and PDF files.
Important: This module cannot upload to personal Microsoft OneDrive accounts.
Dependencies: An Enterprise Microsoft / Azure account with permissions to create, write, and access OneDrive or Sharepoint resources.Azure Setup Process
RackForms uses the Client Credentials Grant Flow to access Azure, and as such requires a properly configured account. These steps will take us through the basic process of setting up an App Registration so that RackForms can access and write data.
First create an App registration within the Azure Portal.
One item to pay specific attention to during creation is the resource sharing model:
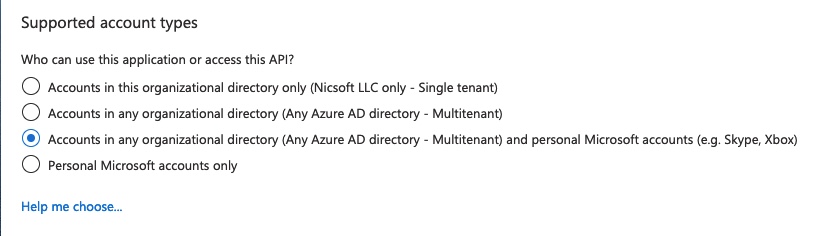
In this case we've opted to create an account that can access Azure and personal Microsoft accounts.
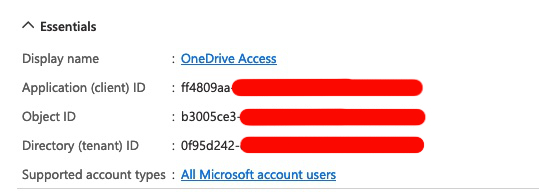
Once created note the API permission items at top, we'll need these for RackForms:
Next we need to create a password for this account. To create one click into client credentials:


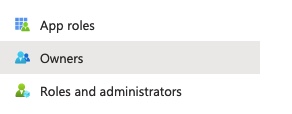
Finally, note the Owners link. If not already known this is where we can find our user's Object ID:
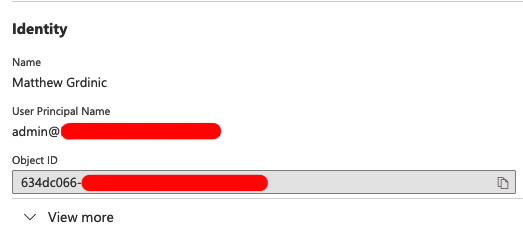
The Object ID is critical, as this is the OneDrive or Sharepoint location we'll write files too.
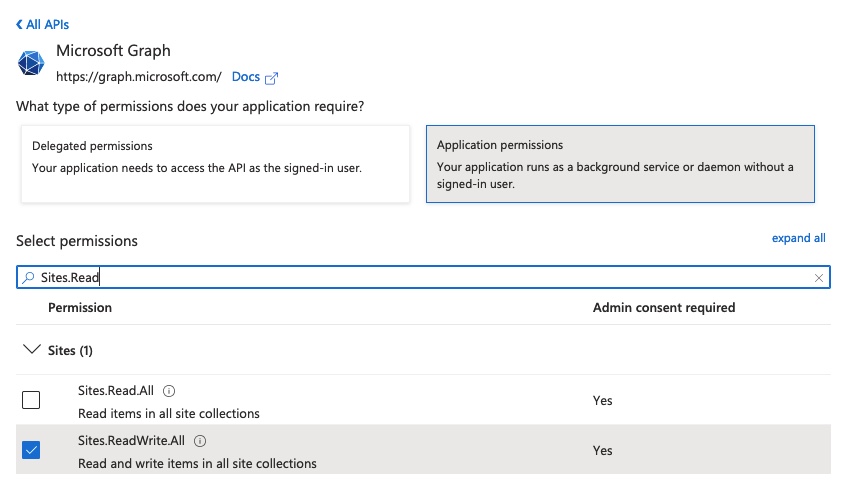
Finally, we need to provide our API with the proper permissions.
To do so head into API Permissions, and because we're using Client Credentials Grant Flow, add Sites.ReadWrite.All as a Microsoft Graph Application permission:
Apply this permission set to our user by clicking the Grant button:

With these steps complete we should have the necessary account settings and values needed to write data from RackForms.
Basic Attributes
Design Notes
These are
notes you can input that help you and other production staff understand your confirmation elements logic and purpose. This text is never used in the live form in any way, it is only for internal development.
Confirmation/Query Condition
Confirmation Condition PHP Code
This field allows you to specify a condition which must be met for the confirmation field to be processed.
We can create code manually, or use the Condition Wizard.Condition Wizard
If you're new to using conditions, or simply want to have RackForms generate the condition code for you, the wizard is a fast and easy way to do so. To create a confirmation condition, simply follow the wizard from top to bottom.
Start by mousing over the This Field: select item. All fields in your form will display, select the item you want to base the condition on.
Please note if we select a Checkbox field an additional select item will display, Having This Checkbox Value (optional):. This select item will display all possible values for that checkbox. Select which value you want to base the condition on. When you do, the condition process is complete.
For all other fields, the next step is to set the Must: field. This will take the value of Equal or Not Equal, and several others.
Finally, type into the This Value: box to set which value the form field we selected above will validate against.
If you want to add additional conditions, such as a name must be Equal to Steve and age less than 10, first select the Additional Condition button and start from the top of the wizard again.
Hand Coding Conditional Code
The logic takes the form of:
Variable 1 | Condition | Variable 2
For example, let's assume we have a radio item in our form with the Name/Value of opt_1. The radio item has two possible vales, 'Yes' and 'No'. If the value of opt_1 is 'Yes' we want to send an email, if no, we do not.
We would write the Confirmation Condition PHP Code as such:
#{opt_1} == 'Yes'
In other words, we use the token for our field variable like we would in other property boxes, that is, a pound sign (#) followed by the Name/Value of the field in braces. Recall that at run time this token evaluates to the value set by our forms users, which in this case will be the value of the radio button with the Name/Value of opt_1.
We then set the comparison, in this case out comparison is equal too, denoted with the double == sign. Finally, because we know our radio item is a string value that can be 'Yes' or 'No', we wrap the value we want to check for in single tick marks.
On the raw code side, RackForms wraps the token call in an isset() block, which is further wrapped in the proper PHP if() syntax:
if(isset($_SESSION['qs']["{$_SESSION['entry_key']}"]['opt_1']) && $_SESSION['qs']["{$_SESSION['entry_key']}"]['opt_1'] == 'Yes') { // condition code start
When run, if the users set value for the radio box was 'Yes', we would process this confirmation element.
Using Array Based Form Elements (Checkboxes)
PHP Treats checkbox items a little differently than other elements. The good news is the only element that needs this special attention is a checkbox field. The difference then, is that in order to use checkbox items we need to place an index indicator just after the form field name.
For example, lets say we have a checkbox field with the Name/Value: email_condition, and it has two elements: Recipient A and Recipient B
To process this field in our condition statement we append the proper index in the format of [index-number]. It's quite simple when you see it in practice:
#{email_condition[0]} == 'Recipient A'
#{email_condition[1]} == 'Recipient B'
Please note the [0] and [1]. These are the index positions of the field being checked. Compare this to a standard field token:
#{email_condition} == 'Recipient A'
A checkbox group has several items, the [0] and [1] bit tell RackForms which number item to grab.
How do we know which number to use? In our example the checkbox field has two values, and array indexs start with 0. Thus, the first field, Recipient A, is [0], and Recipient B is [1].
The rule then is our numbering simply adds 1 for every checkbox item in the group, and always starts at 0.
Feature Discussion
The ability to upload a form submission as a JSON file can be very useful in cases where we wish to perform data warehousing operations. For example, we can use Azure Synapse to process and filter data for analytics and business intelligence. Of course we may also simply want to create backups of file or text data for redundancy or compliance purposes.
Regardless of use the first step is to create an Azure App Registration (described above), so that RackForms can make API calls on your behalf. Once setup the basic workflow is to run a user through a form submission process as normal, and upon submission upload files to the user account and location we define in the module's settings.
The end result of this process will be files transmitted to Azure cloud storage. We can access these files using a OneDrive URL similar to:
https://yourdomain.sharepoint.com/personal/admin_msaccount_onmicrosoft_com/
As noted above we do not support writing to personal Microsoft OneDrive accounts, as this is a limitation of the authentication method we use.
Finally, one handy feature is we can use this PHP array variable to access the file(s) written: PHP{onedrive_url}.
Module Options
Client ID
The client id of the registered app.
Client Secret
The client secret of the registered app.
Tenant ID
The tenant id of the registered app.
User Object ID
The OneDrive or Sharepoint user resource we'll write files to.
Location - Dynamic
The location within the Object ID we'll write files to. This value can be built from dynamic values, as if the location will be cerated dynamically if it doesn't already exist.
Key (File) Name
The name of the file we'll write to. This should almost always end with .json, as that's the type of file we create for you.
Upload Mode
This option determines the type of upload we'll perform. The default is to create and upload a JSON file containing all textual entries. We can also select to upload any PDF files, files, or combinations thereof.
File Format
Currently we only support JSON, but will eventually add Parquet to support more complex data injection workflows.