RackForms
v7.8.9
google docs

Latest Release: Build 959 - November 6th, 2025

Home > Confirmation Elements > Google Docs

In Brief: Used to upload results directly to your Google Drive / Docs account.
Important Notes / Restrictions:
- We cannot save more than 24 form fields to a single Google Sheets document.
- Column names over 25 Characters are truncated.
- Column names cannot contain any characters other than numbers and letters. Any and all special characters are removed.
Options/Properties
Google Docs Message Composer
Google Docs Message
This field defines the content of a text/document insert. Please note this is not used if our Google Docs File Format is set to Spreadsheet.
A important note on file formatsWhen saving to Google Docs we have two types of files we can create: spreadsheets and word processing documents.
Spreadsheets
If we've selected Spreadsheet RackForms will automatically format and send all of our forms data to Google drive. We do not need to take any actions for this to happen, and indeed, we cannot limit the form fields sent to Drive. If the field exists in your form, it's data is sent to Drive for inclusion in the spreadsheet.
Word Processing Documents
Word Processing Documents are treated differently, in that we must define the data that will be sent to drive in the Google Docs Message Composer box. This means we'll use tokens and any HTML formatting we need to create the exact structure the document will become.
Google Docs
Getting Started With Google Drive/Docs Integration For Non-Technical Users
The power of cloud computing is essential for many firms, RackForms allows us to tap into this power with direct integration into Google Drive.
Google Drive and the services under the Drive umbrella, key for us being Google Docs, are essentially online versions of a Word Processor and a Spreadsheet application.
What's key to note is Google used to consider Google Docs its own entity. They now consider it a part of Google Drive, to the point where a search for Google Docs takes us directly to the signup page for Google Drive. The point being when we sign up for a Google Drive account we also gain the ability to access the online versions of the Spreadsheet and Docs applications.
However, along with this change to the Drive integration we also, as developers, became somewhat limited in terms of how we can interact with these Google services while providing the best possible user expirience. Thus, the first and most important factor to consider when using RackForms Google Drive integration is to know we must be signed up for the Enterprise (paid) version of Drive, which is collectively known as Google Apps for Business.
We can learn more and sign up for Google Apps for Business here.
The prices are very reasonable at $5/Month (at the time of this writing).The main benefit to this paid plan is we can get the safest, most professional level of service with both Google and via RackForms.
However, even with a Google Apps for Business account we still need to perofrm a bit of set up so that RackForms can communicate securely with your Google Account's Apps.
Thus, as a quick preview of what's to come, we'll eventually visit this page: https://code.google.com/apis/console To turn on a few settings and copy some values for our Google Docs module to work in RackForms. Finally, as one last security measure we'll visit your Google Apps home page: http://www.google.com/intl/en/enterprise/apps/business/ And visit your domains control panel, which follows the format of:
https://www.google.com/a/cpanel/YOUR_DOMAIN_NAME/
Within the control panel we'll grant something API Client access so that a "service" account can access your Google users data.
We'll cover these steps in detail below. The point for now is that in order to use RackForms and Google apps we must have the paid, "business/enterprise" version of Google Apps, access to the Google Developer console, as well as access to your Google Apps control panel.
If you run a business and have a valid web domain (such as rackforms.com) you will have all of these items, if you're an individual with a simple Google account (such as Gmail, Ad Words, Etc) you may not. It's important to note then that Google Docs integration is usually best for business applications, or individuals who have a Google Apps subscription.
With that background let's go into a more detailed look at the steps needed to "link" our Google and RackForms services.
Step 1 - Enable The Drive API in the Developer Console
So our first step is to tell Google when RackForms submits a form the data from that submission has the "right" to access your Domains Google account apps. Technically speaking, this means we tell the Google Drive service that a special account we'll create shortly, a "service" account, has that right. This service account is what RackForms uses to authenticate and submit the form submission.
Google has a fairly comprehensive write up of this process here:
https://developers.google.com/drive/delegation
The best way forward then is to read through this document and follow the steps within.
A quick hint for this process is to use the automated API helper to quickly create a project that uses the Drive API:
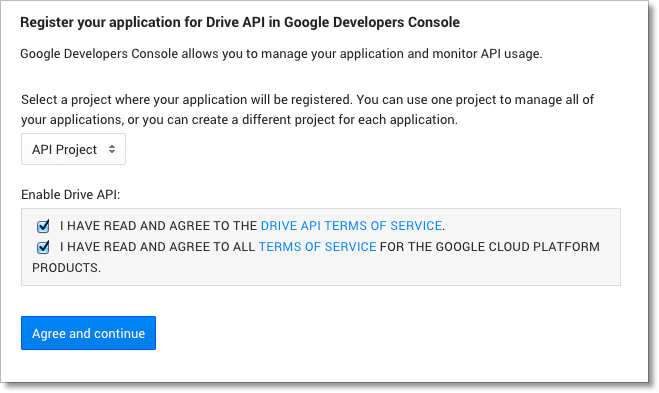
Please note in the image above I've selected API Project as the project to register, your project names may be different, or may need to be created first.
Regardless of which method we use to create our project (the method shown above, or manually in the Google Developer Console), we'll end up at the credentials page. From here we need to create a new OAuth Client ID. Again, please refer to this link for the details.
One important point is we must generate and download a P12 key file, which can be done via this button in the Creditials section:

We mention this as by default, the Google service generates a .json key file, which we do not use.
When we've created our project, OAuth Client ID Service Account credentials, and P12 Key File, we'll login to our Google Admin Console and add the proper delegation account API access. We do this by following these steps:
1. Click the Security Tab: 
2. Click: Advanced Settings.
3. Click: Manage API client access
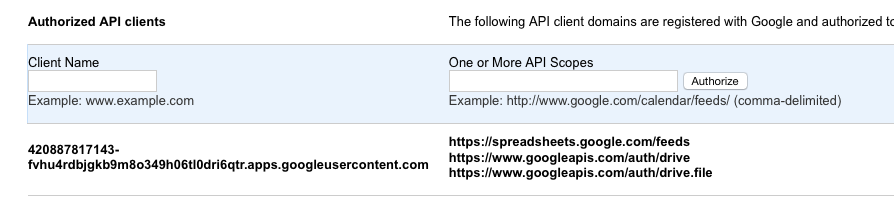
A page appears that contains the heading: Manage API client access. On this page is a text box were we list the client names we've given access too, along with the specific API access rights for that client name. Think of this step as the process of assigning rights to our accounts.
Thus, we'll enter the Client Name value as described in the document in the Client Name box, and enter this for the One or More API Scopes value:
https://www.googleapis.com/auth/drive,https://www.googleapis.com/auth/drive.file, https://spreadsheets.google.com/feeds
For example, my values are:
When done pasting these values in and clicking "Authorize", return to this page.
Step 2 - Place our p12 Private Key File in our RackForms output/Google directory
Following the steps form the Google link above means we've:
- Enabled the Google Drive API
- Created a Service Account
- In the Google Apps control panel, added our Service Account credentials (Client Name and One or More API Scopes)
In summary, what we've done is tell Google that the newly created Service Account has the right to access our domains Google data. This is key because this Service Account is what RackForms will need in our Google Docs properties area, and because it's now an authorized user of our data, form submissions can proceed safely and fully authenticated.
As you'll recall, as part of this process we've created and saved what we call a Private Key File. This file is read and transmitted to Google when we submit a form. Thus, this file must be readable by RackForms and thus, on our web server.
This file can be placed anywhere, but as a default we recommend the rackforms/output/Google/ folder:
We'll need to take note of this location, as we need it in RackForms via the API: Key File setting:
Again, this file can be located anywhere, but using this location means it's standardized across most RackForms installations.
Step 3 - Copy our Service account: Client ID and Email Address values to our RackForms Google Docs settings.
As part of the Google link above we created a service account. Load up the Google console again if not already loaded:
https://code.google.com/apis/console/
And scroll down to the Service Account area. We need these two values for RackForms:
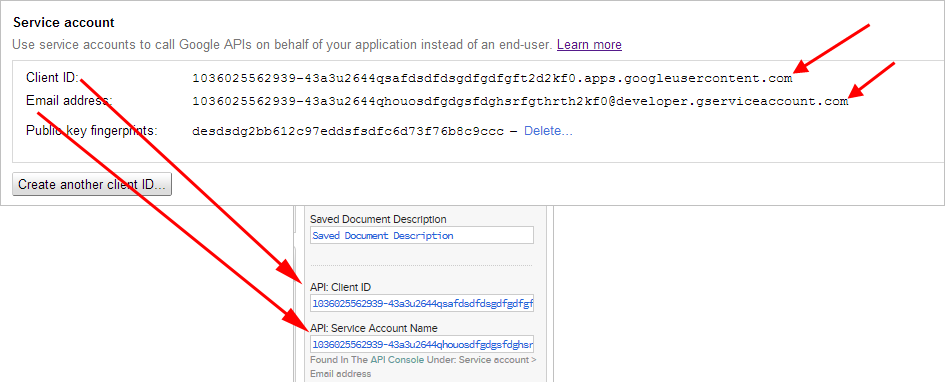
That is, in Google Client ID maps to API: Client ID, and Email Address Maps to API: Service Account Name.
We're almost done! The last step is to say which Google Domain User gets our form submissions. To find a proper value all we have to do is load up our control panel:
https://admin.google.com/YOURDOMAINNAME/AdminHome#Home:
Click the Users button:
And pick one of the users. Please note we need the Email value:
In this case apps@rackforms.com is the only choice, so that's what we'd use. This user login value will then map to these items in RackForms:
With that we should be all set in terms of setting up Google and RackForms.
Please note as these values will rarely change, we can always create a Field Presets element out of the finished Google Docs module item in RackForms for easy placement in the next job:
Please see below for specific help for each item.
Information For Technical Users
In this section I would like to talk briefly about some of the technical aspects of how Google Drive integrates with RackForms.
At the time of this writing Google Drive's integration with the product family formerly known as Google Docs is still in some degree of flux from an API perspective.
The most important point of interest is long-standing limitations with the Apps API and their respective client libraries. Specifically, we cannot create create or delete files in (what's now) Google Drive using the old API's. Their are work-around's, but as these API's are being depreciated in favor of the new Drive ones, we're left with a scenario where at some point it's simply best to go with the Drive API.
What this means for us is that to provide the most secure and robust solution we're decided to use OAuth 2.0 and the Drive API's for file creation, and GData for spreadsheet manipulation. At some point we'll no doubt be able to move more functionality (or all) to newer client libraries, but for now this means we need both.
Another complication is we cannot use the "free" Google accounts and the Drive API's without resorting to manual authentication. This is of course totally unacceptable in a form submission scenario, as that would mean every user would have to click yes to allowing access to Google data.
The only current and working solution then is to require the use of Enterprise Google Apps for Business where we can enable account delegation via the domain control panel.
At some point this may be relaxed, which would mean instead of needing service accounts we would just need a simple Google login.
Google Docs Saving Enabled?
If disabled, no saving of data occurs.
Google Docs File Format
An important setting, in that this determines the document type we create. If it's spreadsheets we'll create a document if needed, titled as set by Saved Document Name. We then add a top column to the spreadsheet that's the label property of the form element, and then entries below that for each form item.
One very important point about spreadsheets is to try your best to not change the form after its been created. RackForms will add new columns to an existing spreadsheet, but at this time it will not change names if the column count hasn't changed. Thus, when saving to Google Spreadsheets try and create the form once and not update it. If you have to update the form, save it under a different file name.
If Docs we create an html upload and submit the file to Google docs, performing an automatic conversion to Google Doc format in the process. This means we'll retain most formatting of the document as well as the ability to edit.
Document Save Mode
This should usually be set to append for Spreadsheets, and Create new Document for docs. Please note if the document name we've defined in Saved Document Name doesn't exists in your Google Drive, it will automatically be created for both file types.
Saved Document Name
The name of the document as it appears in the Drive document list.
Saved Document Description
The description of the element.
API: Client ID
In Google this is the service account Client ID.
API: Service Account Name
In Google this is the service account Email Address.
API: Key File
The p12 file generated by the Create an OAuth 2.0 client ID process. Please see above for a full description.
One important note here is this value must be a file system location, and not a URL.
API: User To Impersonate
The Google user id (usually an email address) of the domain account we'll send submissions to.
API: User To Impersonate Password
The Google user password of the domain account we'll send submissions to.