RackForms
v7.8.9
e-commerce

Latest Release: Build 959 - November 6th, 2025

Home > Confirmation Elements > E-Commerce

In Brief: Used in conjunction with the form e-commerce item, this is the component that actually creates the connection between your service and the payment merchant.
Dependencies: A merchant account with PayPal, Google Checkout, Authorize.Net, or 2Checkout.
Hints & Tricks: In order to process an e-comm item, you also need to create an e-comm field element. In other words, this element processes the item you create on a form page.
Options/Properties
E-Commerce Delivery Options
This field lets us set the various parameters our payment gateway accounts expect.
Transaction Vendor
Set this to the vendor of your choice. Please note that some vendors support different features. For example, only PayPal and Stripe support transactions other than simple buy now buttons.
Process This Field
The Name/Value property of the form item you want this payment gateway to process. You can only have one item per payment gateway unless you select Shopping Cart Items from this menu, as well selecting Shopping Cart Item from the E-Comm field items Transaction Type menu. In short, by default we usually only process one e-commerce field per E-Commerce confirmation page item. However, as of Build 676 we can now process more than 1 field if we are: a) using PayPal and b) making sure to select Shopping Cart Item from both menus.
Important Note On Shopping Cart Limitations
At this time we cannot mix and match shopping cart and non-shopping cart items. If you have 1 shopping cart item, non-shopping cart items will not process.
Also, at this time we cannot process more than 1 item per e-commerce field item.
As a point of reference, RackForms uses the PayPal _cart and upload variables to handle multiple items. This is a great way to upload multiple items at once, but has a serious drawback of, when you reach the PayPal checkout page, not showing the user individual items like a traditional shopping cart. If you need a full-on shopping cart solution we'll want to use Stripe as our payment gateway.
Transaction Page Target
If leaft as the default, Same Window, the transaction processes in the same window as the rest of the form. If we set to New Window, the user is takes to a new tabor window for the transaction page.
Please note this option does not pertains to or effect Stripe or PayPal Express Checkout Transactions. This is because those tranactions create an invoice page.
Invoice Page Style
This option lets us select how an invoice page will be shown to our users in terms of layout and general style.
It's important to note an invoice page is only created for forms when Stripe or PayPal Express Checkout is the selected Transaction Vendor. That is, for payment solutions that collect credit card data from users.
We have two general classes of style: Full Page and Inline.
Full Page means an invoice page that contains a background color, and spans the entire page width. Because an invoice page retains the same state as the calling form page, a form page that starts as an iFrame will load an invoice page in the same iFrame. This means the form this E-Commerce module belongs to should also be a full page form. While we could certainly use this style in a form that uses am iFrame, the results would usually be suboptimal.
Form those times when our form is embedded in an iFrame, the Inline Options is what we should choose. This layout has no background or page borders, and had fewer background colors on our form elements. A real key here is the form page is also fully responsive, which means the form automatically changes layout to best fit the current device its being displayed on.
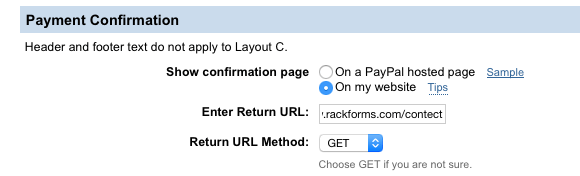
Return URL
Not used by all vendors, the url you want your visitors to be directed to after a transaction.
PayPal Users: In order for this option to work you must select the second or third option from the Return Method select item.
Also note this value, when used, will override Go To This Page After Transaction. This means in most cases this field is used when we wish to redirect the user to a page that's off-site, that is, not on the original domain our payment form lives on.
For PayPal Payflow users, this value can be overriden in the PayPal Manager by entering a value of OVERRIDE. Doing so will allow the value (if any), we've entered into the Enter Return URL box to be used instead:
Cancel URL
The cancel url a visitor will visit is the gateway provider supports one.
Notify URL / Payflow Silent POST URL
For most vendor types, The URL to notify during (though usually after) a transaction.
PayPal IPN
This is a very important field for PayPal's Instant Payment Notification (IPN) system, as when provided this is where PayPal sends that transactions IPN messages. It's important to note this is essentially an override, as PayPal also lets us define IPN values in our PayPal account settings under Instant Payment Notification Preferences. However, when this field is provided it supersedes that value and setting.
From an implementation standpoint then PayPal will attempt to contact this address when a valid event has occurred, which for our purposes, usually means when a successful payment has been made on PayPal's web site.
The messages sent are handled by an IPN listener we create, with the process being described in more detail here.
The good news is this system is surprisingly easy to implement, and to aid in this process we have added a sample code block called PayPal IPN Listener Sample Code in the PHP Top Code helper code area. This code is a copy/paste of the code available on PayPal's web site, the purpose of which is to provide the basic capture mechanism for IPN messages.
When added to a new RackForms form page then, if we provide this page's URL as the E-Commerce transactions Notify URL, PayPal will contact this page with all IPN messages for that transaction.
So for example, lets say we want to add a user record to a database upon successful payment. Using the IPN listener page we would capture the IPN message, and use this page as a reference to the type of variables PayPal sends with the IPN message.
Checking the chart from the previous link, we can see a variable called payer_email will contain the email address of the PayPal user. We would then use this variable to implement our database logic.
PayPal Payflow Link
This field is also used to specify the Silent Post URL property for the PayPal Payflow Link method. A silent Post URL is a callback PayPal's servers make to a location you specify when the transaction has been processed. Critically, this callback contains data fields specifying details about the transaction. We can use this data to populate a database, send custom email's, and so on.
Important: For maximum flexibility this value can take one of three distinct values:
1. If we've defined this value in the PayPal Manager interface and want to use that value, enter the exact text string: OVERRIDE. This will prevent any value from being used in RackForms, be it a custom value or the checkout page itself. This is also the value we'd want to use if we do not want any silent post functionality to run.
2. Enter a Custom URL to point to a specific location. This will override any value we've entered in the PayPal Manager interface. Please note if we use this value, we'll need to process the resulting post from PayPal's servers using custom code we've written. This response will contain a string of name value pairs we can use as needed.
3. Finally, we can leave this field blank to perform a silent post to the RackForms generated checkout page. This method will write data to a custom database table called fb_payflow_transactions.
For methods 2 and 3, it's key to note RackForms populates a custom checkout parameter called USER1. This value contains a unique identifier for that form users session, and can be used to tie a checkout transaction back to to an original form user. This is particularly important for method 2, in that this value will be present in the POST's ECHODATA parameter.
Additional Notes On PayPal Manager
The PayPal Payflow system includes a handy management tool for creating and customizing hosted checkout pages. Part of this process is defining various aspects of the checkout process, such as the page layout, error text, and so on. As RackForms is performing a key intermediate step of your checkout process, some of the values we define on the manager page are overridden by RackForms.
A good example of this is the Enter Error URL property under 'Display options on payment page'. As RackForms needs to process any errors during a transaction, and as the forms checkout/invoice page can be difficult to find manually, this value is never used, instead, RackForms manages this for us.
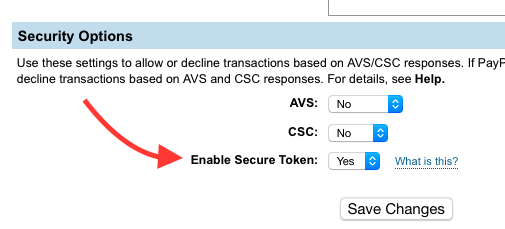
PayPal Manager Setup
Finally, an absolutly essential part of the integraiton process is to manage and set settings in the PayPal Manager.
Start by setting: Enable Secure Token in the PayPal Manager > Service Settings > Hosted Checkout Pages > Set Up area:
Next, double check our transaction settings under:
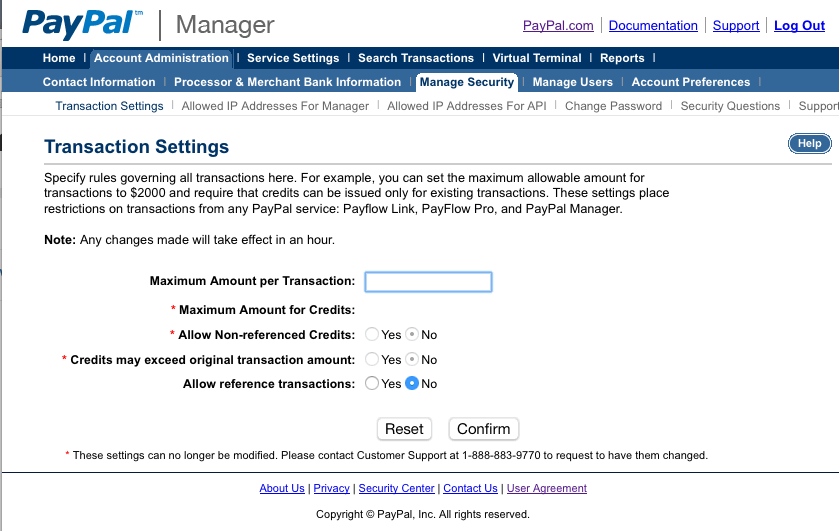
If these values are blank your transactions will not process, even in testing mode.
We'll also need to modify our Fraud Protection settings found under:
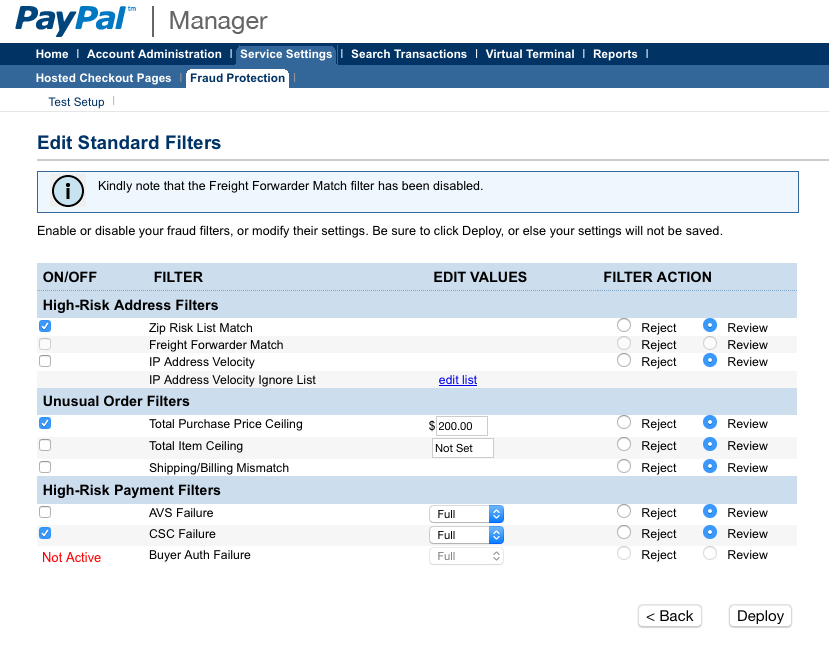
By default, a new account will use invalid values, we'll need to match the above with:
Set or uncheck Total Purchase Price Ceiling.
Disable Total Item Ceiling and, if not requiring Shipping address in RackForms, Shipping/Billing Mismatch.
Without these changes and possibly others (depending on your setup), a transaction will not process. Please note it can take up to 2 hours for these settings to be applied to your PayPal account, so if at first the transaction fails, it may need more time to process.
Other Vendors
Other payment vendors may support such notifications as well, such as Autorize.NET's Silent Post feature. Please see your payment gateways documentation for full details.
Adding Shipping Costs
By default, Stripe and PayPal do not account for shipping costs, they only care about the final billing amount to charge to user. Thus, in order to add a shipping/delivery price, we must do so manually in code. RackForms account for this in the automatically generated invoices it creates for PayPal Express Checkout and Stripe.
Key to this process is the final shipping cost must be set as a PHP session variable called shipping, as in:
$_SESSION['shipping']
Thus, to create a $10 shipping charge, we would add the following code to the PHP Top Code Block of our submission page:
<?php
session_start();
$_SESSION['shipping'] = 10.00;
?>
So long as this session variable exists and has a value, this is the amount that will be added to the users final charge amount. It's key to not, however, that this value is not itemized in the users invoice that Stripe or PayPal generates.
PayPal Specific Options
PayPal Account Email
Your PayPal account email. Required.
Return Method
This option requires a value for the Return URL to work. When set to the second or third option, your users will be redirected back to the page specified in the Return URL field. If left on the first option, users will land on the payment confirmation page and not be redirected.
Working Environment
Sandbox or production.
PayPal - Express Checkout / Payflow Specific Options
Quick Links:
PayPal test Credit Card Numbers
PayPal API User ID / Payflow User
Express Checkout: The API Key User ID Value given to you by PayPal.
Payflow: The Merchant Login for your account.
PayPal API Password / Payflow Password
Express Checkout: The API Password provided by PayPal.
Payflow: Your Payflow user password.
PayPal API Signature / Payflow Partner
Express Checkout: The API Signature provided by PayPal.
Payflow: Usually PayPal, but may also be the name of your payment clearing house.
Working Environment
Sandbox or Production.
Require Email Address
As the name implies, this box will force the user to enter a valid email address on the payment form. This is essentially required data if we want to send the users confirmation emails, and so on.
Ask for Billing Address
When checked the payment form will ask for billing address.
Ask for Shipping Address
When checked the payment form will ask for shipping address.
Success Message
The message users are shown when a payment transaction has completed. This code can be HTML, which means we can provide links. While simple, the downside is this method doesn't allow for additional processing, such as sending emails. To perform those actions we want to use the Go To This Page After Transaction option.
Go To This Page After Transaction
This option, blank by default, is used to redirect to another page after a successfully payment transaction. The key to this option is by default when we process a transaction we do not perform any additional steps. This option thus allows us to to redirect to another page to handle sending emails, add database records, and so on.
As part of the redirect process RackForms saves and then makes available important PayPal transaction data, such as the charge id, the transaction total, and so on. Available items are listed below this field.
One key caveat is because PayPal Express Checkout doesn't require email addresses to process transactions the only time this data is guaranteed by PayPal is if the user signed up for a subscription item. Thus, if we must capture the users email address but do not have subscription items, we must check the Require Email Address option box, as this will force the user to always supply a valid email address. We can then use that address via its token: F{express_required_email} to send the user follow up emails, invoices, and so on.
Please note this value is overridden by any Return URL value we set. Thus, if we wish to perform any processing, we'll leave the Return URL field blank and use this value instead.
PayPal Subscriptions
We can use PayPal's ability to manage subscriptions to create powerful subscription jobs in RackForms.
To create a subscription in RackForms is quite simple:
- First, we'll create a standard form page and add an E-Commerce module to it.
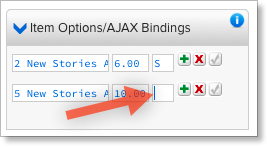
- Next, under the new item's Item Options/AJAX Bindings field we'll add the product descriptions for each item we want a subscription for.
- Important: For an item to go from a standard, non-subscription item to one that is, we must enter an Upper-Case S in the third field of the Item Options/AJAX Bindings row.
For example, the first item in this list is a subscription item, the second has no S, so it is not:
- Next, under the items E-Commerce Item Options > Transaction Type field we'll set we'll set it to: Shopping Cart Item / Stripe / Subscription Item
- Under Subscription Item Options we'll define our subscription properties, such as Period and Units.
- At this point the form item is done, and we can now turn our attention to the Confirmation/Submission page item.
- First, under Transaction Vendor we'll select PayPal Express Checkout.
- Next, under Process This Field we'll select the E-Commerce form item we created earlier.
- Enter your PayPal API keys for User ID, Password, and Signature.
- Set any other values, such as changing the Working Environment to Sandbox for testing (always a good idea!), and Go To This Page After Transaction for sending the user to a custom page, such as a login.
Managing PayPal Express Checkout Transactions
When we use PayPal Express Checkout as our gateway all payment processing is managed via the PayPal control panel. However, we also save all transaction data to a RackForms database table: fb_express_transactions.
All data saved to this table is keyed off the transaction_id column, which is the same identifier we see in the PayPal Admin Site. Thus, we can lookup transactions and pull all related data from this table.
Key to this is the line_items column, which contains a JSON record of all items purchased. We can also view the subsciption_data (JSON) data, the date, and so on.
In the very near future RackForms will integrate a viewer for this data in the editor environment.
2Checkout Specific Options
RackForms supports the Plug and Play cart method.
2CheckOut Merchant ID
Your 2Checkout Merchant ID. Required.
Working Environment
Sandbox or production.
Authorize.Net Specific Options
RackForms supports the Server Integration Method (SIM) for single products.
Authorize.Net API Login ID
This is the API Login ID you received when you created your merchant account.
Transaction ID
Similar to the Login ID, this identifier was provided to you during your account creation, and can be accessed via your Authorize.Net user administration web site
Working Environment
Test or production. If test, your orders are not processed, but they do go to a sandbox environment.
Stripe Specific Options
The main benefit of Stripe is we can have a fully itemized list of our users products and services presented before they submit using direct credit card payments.
Watch a demo video showing the main concepts of Stripe integration.
We can grab a Stripe account in just a few minutes. Please note Stripe only supports purchases in the US and Canada at the moment, though testing has just started for UK users.
Important Stripe Limitations: Please note at this time we do not calculate or support shipping price information. That is, only adding tax to the final price is supported. Also note that we do not have a transaction wide tax method. That is, if we have several items we must set a text rate on each item. However, even then we can only have one tax rate.
Live Mode
The mode we run the transaction in, live or test.
Live Secret Key, Live Publishable Key, Test Secret Key, and Test Publishable Key
Obtained by having a Stripe API key.
Require Email Address
As the name implies, this box will force the user to enter a valid email address on the payment form. This is essentially required data if we want to send the users confirmation emails, and so on.
Ask for Billing Address
When checked the payment form will ask for billing address.
Ask for Shipping Address
When checked the payment form will ask for shipping address.
Success Message
The message users are shown when a payment transaction has completed. This code can be HTML, which means we can provide links. While simple, the downside is this method doesn't allow for additional processing, such as sending emails. To perform those actions we want to use the Go To This Page After Transaction option.
Go To This Page After Transaction
This option, blank by default, is used to redirect to another page after a successfully Stripe payment transaction. The key to this option is by default when we process a transaction we do not perform any additional steps. This option thus allows us to send emails, add database records, and so on.
As part of the redirect process RackForms saves and then makes available important Stripe transaction data, such as the charge id, the transaction total, and so on. Available items are listed below this field.
One key caveat is because Stripe doesn't require email addresses to process transactions the only time this data is guaranteed by Stripe is if the user signed up for a subscription item. Thus, if we must capture the users email address but do not have subscription items, we must check the Require Email Address option box, as this will force the user to always supply a valid email address. We can then use that address via its token: F{stripe_required_email} to send the user follow up emails, invoices, and so on.
Stripe Subscriptions
To create subscriptions in Stripe we must know a bit of background of how Stripe handles subscription logic.
In the Stripe API we create a plan with a call to:
Stripe_Plan::create(array(
  "amount" => 2000,
  "interval" => "month",
  "name" => "Amazing Gold Plan",
  "currency" => "usd",
  "id" => "gold")
);
In RackForms we abstract this out just a touch so that it becomes:
$plan = Stripe_Plan::create(array(
  "amount" => $si['price'] * 100,
  "interval" => $si['interval'],
  "name" => $si['display-name'], // the display name of the plan in the Stripe Dashboard
  "currency" => $currency,
  "id" => $si['plan_identifier']) // the id of the plan, used below and internally to identify the plan.
);
// we then assign the customer for the transaction to the plan:

// assign customer to plan
$customer = Stripe_Customer::create(array(
  "card" => $_POST["stripeSubscriptionToken_{$idx}"], // indexed based on how many subs we have
  "plan" => $si['plan_identifier'], // same as id when creating the plan
  "email" => $si['customer_identifier'])
);
Thus, the important part is knowing which fields in RackForms map to which Stripe API values.
The three main fields are:
Basic Attributes > Label which maps to: Stripe::Plan::name
E-Commerce Item Options > Subscription Item Options > Plan Identifier (Required For Stripe) which maps to: Stripe::plan::id
E-Commerce Item Options > Subscription Item Options > Customer Identifier which maps to: Stripe_Customer::create::email
Thus, the e-commerce items Label field will be the value Stripe shows for the plan name, the id attribute comes from: Plan Identifier (Required For Stripe), and the way we identify users comes from Customer Identifier.
So long as we have these fields creating plans in RackForms should go off without issue. Please note RackForms has conditional logic so that if the plan is not found a new one is created, and if it already exits we use it untouched.
Managing Stripe Transactions
When we use Stripe as our gateway all payment processing is managed via the Stripe control panel. However, we also save all transaction data to a RackForms database table: fb_stripe_transactions.
All data saved to this table is keyed off the charge_id column, which is the same identifier we see in the Stripe Dashboard. Thus, we can lookup transactions and pull all related data from this table.
Key to this is the line_items column, which contains a JSON record of all items purchased. We can also view the subsciption_data (JSON) data, the date, and so on.
In the very near future RackForms will integrate a viewer for this data in the editor environment.