RackForms
v7.8.9
virtual host setup

Latest Release: Build 959 - November 6th, 2025

Home > Installation / Configuration Guides > Virtual Host Setup

Contents: Introduction | Step 1 - Hosts File | Step 2 - Apache | Conclusion | Extra Links | Video Tour
Introduction
In this document we describe the process of setting up a Virtual Host, with the most common use of this technique being to run RackForms on a local machine. We usually run in this manner because our domain name doesn't point to a "live" server, because we don't have a domain name or are transferring domains, and several other reasons.
Regardless of intent and need the end result is we run RackForms locally instead of on a public facing web server, which has many benefits including faster access and greater security.
The first step in this process is making sure we have a proper local web server stack installed on our machine, of which Zend Server CE (our recommendation for all OS types), XAMPP, and MAMP (for Macs), make short work of.
In each of these cases we run an installer which places the web server "stack" on our machine, which simply means it installs Apache, PHP, a MySQL database server, and all supporting infrastructure (config files, etc).
It should be said that while this allows us to run RackForms locally, it's also a great way to set up a "proper" testing environment for all your web development needs. Having a local web server stack means you'll see your site as it's being developed the exact same way a "live" user will when it's on the full web.
As noted above we recommend Zend Server CE, and while free like all the others it's what we use for our development, as it's generally the most stable, feature rich stack. One quick note though is that by default the Zend Server doesn't install a MySQL database, so please be sure to select that option from the installation options screen.
No matter which stack we install, please take a moment after installation to get familiar with the basic lay of the land. Zend Server has a web-based control panel and also, on Windows, installs a System tray icon for managing the Apache web server. Other tools perform similar tasks. The most comfortable you are with the stack you just installed the better!
With the installation of a web stack done we move on with the instructions for the RackForms bit!
Step 1 - Configure The Hosts File
So the first step is to create a hosts entry for our domain to match the one it's licensed for. Of course key to this process is we have a domain name selected and that we've entered via the [Add License Key] link on the rackforms.com downloads site (the same place we downloaded the rackforms.zip file from).
This domain name doesn't need to be real of course, but it does have to look like a standard domain name, as in it should be something we could actually register as a real domain name at some point in the future.
Provided we have a domain name in mind and/or registered then, we want to add a hosts entry to the hosts file.
On most modern Windows systems (64 bit and others) this file is located at:
C:\Windows\System32\drivers\etc
On Mac and other *NIX variants the location is generally:
/ect/hosts
On all OS's we want to make a copy of this file to a ‘safe’ location, that is, one where you have write access, such as your Documents folder. We then edit the copied version in our writeable location, then save it and overwrite the original one (On basically everything except Windows XP we'll need to be an administrator to perform this step). Besides being required on most OS's for security reasons, this way we always have a backup of this important file!
Windows Specific
On Windows (again, with the exception of XP) this means navigating to the hosts file and creating a copy of it on the Desktop or Documents folder, then changing the copy using Notepad/Wordpad as described below and when done, over-writing the one in C:\Windows\System32\drivers\etc.
Mac/Linux Specific
On Mac and Linux working with the hosts file means using the Terminal program, which on Mac is located in the Applications > Utilities folder, and on Linux in System > Utilities or similar.
When the terminal opens we need to become the root user, which can be done in Ubuntu via:
sudo vi /etc/hosts
or Fedora:
su - vi /etc/hosts
In newer versions of Fedora we have the option to add our desktop user to the sudo's list, which means sudo vi /etc/hosts would work as well.
On Mac we should be able to use sudo as well.
If your not a fan of vi I personally recommend nano, which can be gotten via:
Fedora: sudo yum install nano
Ubuntu: sudo apt-get install nano
Nano should be installed on OS X by default.
Provided we have nano installed then for all variants we would use:
sudo nano /etc/hosts
All OS's - Adding The Hosts Entry
The process of adding to the hosts entry is the same for all OS’s, in that we add a localhost entry that binds to our ‘fake’ web domain name and intercepts the call to prevent it from reaching the "real" Internet.
For example, if I wanted to bind to www.formboss.net I would open the copied hosts file and add the bit being pointed at:
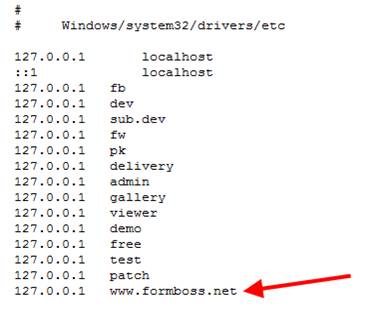
The first column, the 127.0.0.1, is a special IP address called our localhost loopback address, and means the request for the domain name we'll add in the second column maps to this machine as opposed to somewhere else on the local network or Internet. Note how the first line is always 127.0.0.1.
The second column is the hostname we want to map to that ip address.
When set as shown above, any request coming from a web browser (or any other local network interface) on our local machine will be handled by our local machine. This is what we mean by intercept. Instead of the request to www.formboss.net being handled by a DNS server at your ISP and the by the real server on the Internet, it's handled in the hosts file and mapped to 127.0.0.1, which is the local address of the machine. Because our local Apache install is listening to that address for http requests, we effectively serve that site when typed into a web browser.
More info on the hosts file on windows and general host file information.
Step 2 - Configuring Apache Or Create IIS Site
The final step is to tell our local web server about this new site. For IIS users this is very simple, just open IIS Manager, select the Sites node, right-click, and select Add Website...
Give the site a name, set the physical path to the place we extracted RackForms, and critically for the host part, enter the same custom host name we created in the hosts file into the Host name: field. That's it!
For Apache users the proces is a bit more involved. First, we need to tell Apache to serve that localhost request as defined in the hosts file. We do this by adding a vhost entry to an Apache config file, which is generally a separate entity from the base httpd.conf file called: vhosts.conf. Of course it should be said that this setup, that is, if we define the vhost in httpd.conf or in a different file called vhosts.conf, varies depending on system and package.
For example, Debian Linux distributions (like Ubuntu) generally have a separate file and folder structure for defining virtual hosts. This is done in /etc/apache2/sites-availible and etc/apache2/sites-enabled. The trick is that /sites-availible contains the virtual host definitions for each site, but only when a symlink of these files is placed in /sites-enabled do they get served by Apache.
This is a pretty darn elegant setup, and highlights just how modular and customizable Apache is. It is however, a bit more involved than what Windows user have to deal with.
The good news is Windows and Mac users generally have it a bit easier. For a stand-alone Apache for Windows install our vhosts.conf file is typically located at:
C:\Program Files (x86)\Apache Software Foundation\Apache2.2\conf\extra\httpd-vhosts.conf
For a 64-bit Windows Zend Server CE setup :
C:\Program Files (x86)\Zend\Apache2\conf\extra
On Linux and Mac this path varies as described above; please contact me for more details if you cannot find it, or check the links below for specific instructions for your stack.
Of course if you have XAMPP, Zend Server CE, or some other bundled Stack, this file should be easy to find, as it will be located within the same directory as all other files for that stack. This is true for Windows and Mac/Linux etc.
When we find the file (using my same www.formboss.net example), I would scroll to the bottom of the vhosts config file and add:
<VirtualHost *:80>
ServerAdmin email@formboss.net
DocumentRoot "C:/Program Files (x86)/Apache Software Foundation/Apache2.2/htdocs/formboss"
ServerName www.formboss.net
</VirtualHost>
This tells Apache to take any request to www.formboss.net and serve the content from the path specified in DocumentRoot directive. Of course your path will be different for this step; the key is to make sure you get the correct one!
Please be sure to restart Apache after this change—there is no need to restart you computer at any point during this process.
Conclusion
Now we just need to open a new browser window (an existing session will not work, a browser restart is required), and when I type in www.formboss.net:
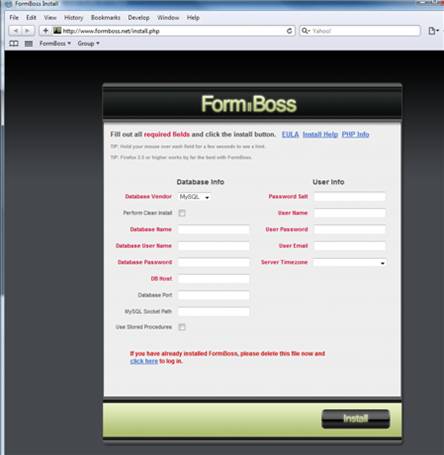
My local machine is handling the request!
So to say it one more time (as this is tricky the first few times we see it in action!): because we edited our hosts file any request to formboss.net is routed back to our local machine. Because we also now have a web server listening for such requests and because we have a matching entry in our vhosts.conf file it handles that request for us, giving us the local file.
This whole process is actually quite slick and quite common, as it makes development much easier as well.
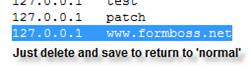
To switch this behavior off, we just remove the entry form the hosts file:
Extra Links
Finally, it’s worth noting that while the instructions above will work on a general level, the various stacks will have slightly different locations for files, as well as configuration file layouts.
Thus, here are a few links for the various stacks:
XAMPP
http://drupal.org/node/161975
http://tildemark.com/software/servers/setting-up-virtual-hosts-with-xampp-running-on-windows-xp.html
http://forums.whirlpool.net.au/archive/569991
http://maff.ailoo.net/2008/07/set-up-multiple-virtual-hosts-on-xampp-for-windows/
http://textpattern.net/wiki/index.php?title=Using_XAMPP_%28Apache-MySQL-PHP-Perl%29_for_Windows
http://google.com/search?q=Xampp+virtual+host&ie=utf-8&oe=utf-8&aq=t&rls=org.mozilla:en-US:official&client=firefox-a
Zend Server CE
http://blog.servergrove.com/2009/06/10/running-zend-server-on-mac-os-x/
http://forums.zend.com/viewtopic.php?f=8&t=239
MAMP
http://aschroder.com/2009/02/how-to-set-up-apache-virtual-hosting-on-mamp-for-magento/
http://forum.mamp.info/viewtopic.php?t=122
Video Tour
Although we strongly suggest reading this page to get the best understanding of the material and process, this video should help us get a first hand look at the technology involved with using and setting up virtual hosts.